PE Cooking Blog WordPress theme manual
A. GENERAL
1. Introduction
This documentation is last updated on 23th June 2017.
Thank you for purchasing PE Cooking Blog Theme . If you have any question that is beyond the scope of this documentation, Please feel free to create a support ticket using Our Support Site.
If you like this theme, Please support us by rating this theme with 5 stars.
Before you start please choose if you want :
- manual import demo content
- use Quickstart package
If you choose Quickstart option please skip points A2 and A3.
2. Installing the Theme
3. Install Plugins
4. Demo Copy installation (option 1)
5. Manual Demo Content Import (option 2)
Demo Site Configuration
Configure Reading Settings
B. THEME OPTIONS
1. Basic Settings
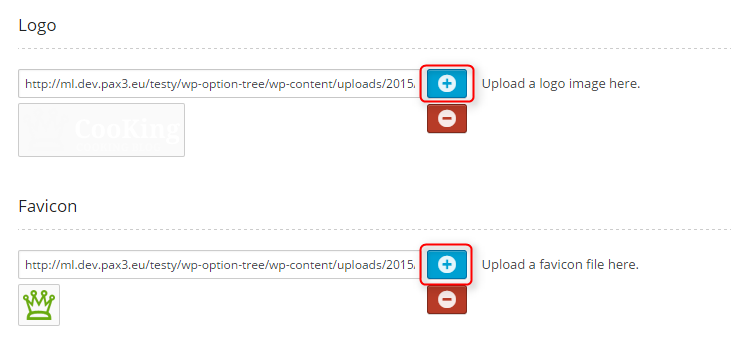
To setup Logo, navigate to Appearance > Theme Options, click on Basic Settings tab and then click on PLUS icon in Logo section.
To setup Favicon, navigate to Appearance > Theme Options, click on Basic Settings tab and then click on PLUS icon in Favicon section.
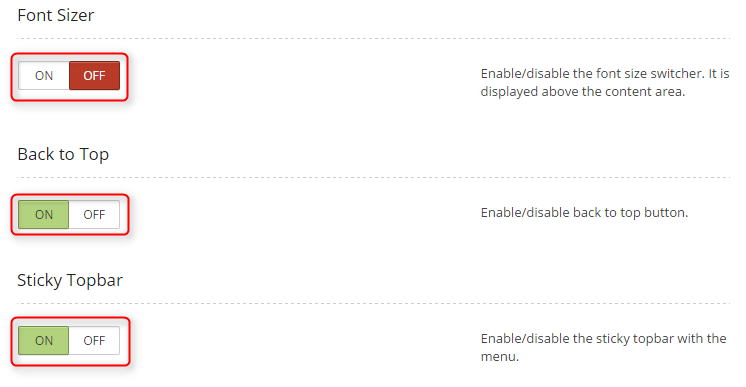
Choose if you want Font Sizer - click ON or OFF.
Choose if you want Back to Top button - click ON or OFF.
Choose if you want Sticky Topbar - click ON or OFF.
Click Save Changes when you are done.

2. Static Header
To setup Static Header Image, navigate to Appearance > Theme Options, click on Static Header tab and then click on PLUS icon in Static Header Image section.
You can select overlay for header area (for slider or static image).
You can choose:
- No-overlay: no overlay at all
- Topbar overlay: overlay for area with logo, mainmenu and social icons
- Topbar and Slider overlay: overlay for whole header
You can also choose opacity for overlay.

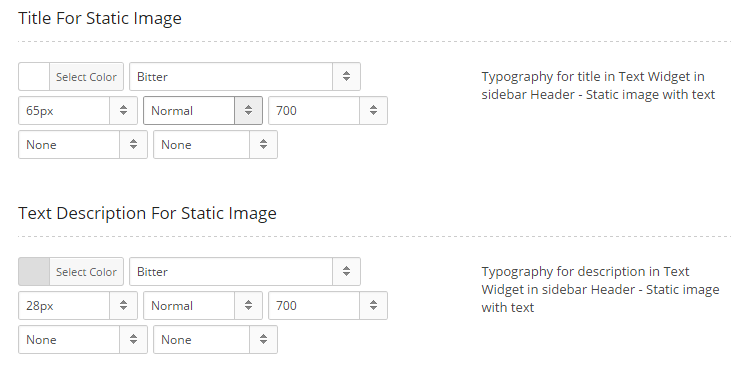
You can change typography for Title For Static Image and Text Description For Static Image.
You can change:
- font-color
- font-family
- font-size
- font-style
- font-weight
- text-decoration
- text-transform
Click Save Changes when you are done.
3. Menu Options
To setup Menu Options, navigate to Appearance > Theme Options and click on Menu Options tab.
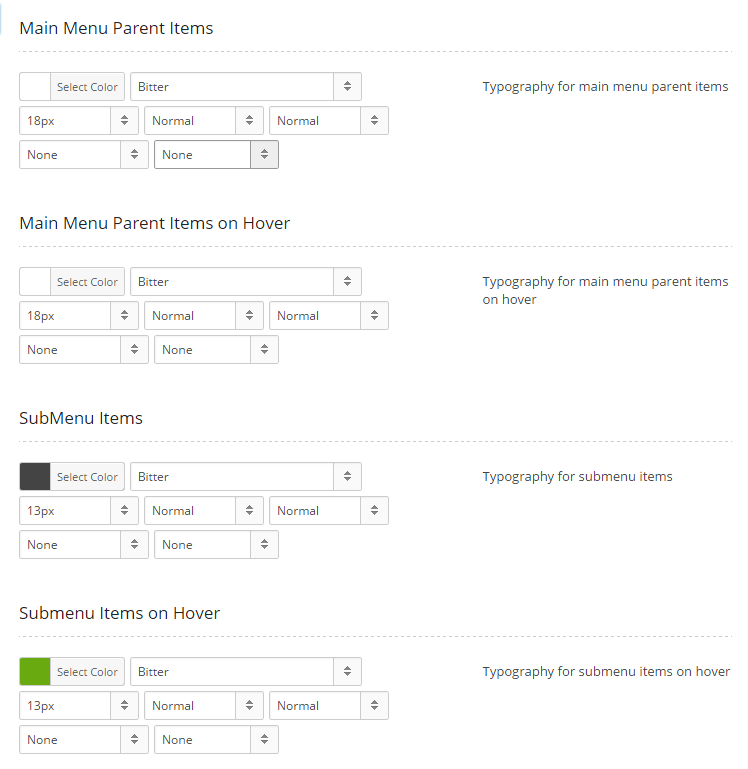
You can change typography for Main Menu Parent Items, Main Menu Parent Items on Hover, SubMenu Items and Submenu Items on Hover.
You can change:
- font-color
- font-family
- font-size
- font-style
- font-weight
- text-decoration
- text-transform
Click Save Changes when you are done.
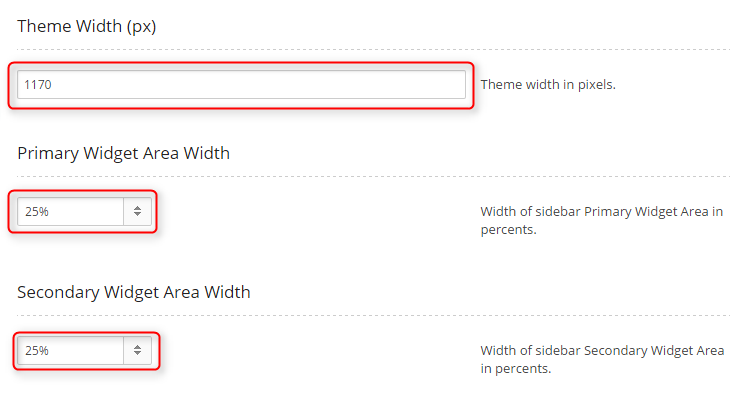
4. Layout
To setup Layout, navigate to Appearance > Theme Options and click on Layout tab.
You can set theme width in pixels and width of Primary Widget Area and Secondary Widget Area.
You can select number of columns and arrangement of them for frontpage and subpage separately.
You can choose:
- Left Sidebar
- Right Sidebar
- Full width (no sidebar)
- Dual Siebar
- Left Dual Sidebar
- Right Dual Sidebar
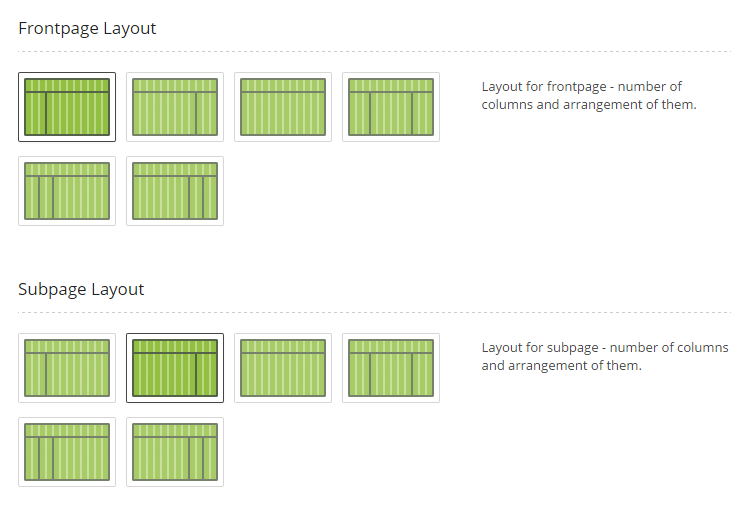
Click Save Changes when you are done.
5. Recipe
To setup Recipe options, navigate to Appearance > Theme Options and click on Recipe tab.
Choose if you want to show Social Icons on recipe page - click ON or OFF.
Choose if you want to show Rating - click ON or OFF.
Enter email address of user that will receive info about new recipes submited form the frontend (Submit Recipe Page).

Click Save Changes when you are done.
6. Default Blog Layout
To setup Default Blog Layout options, navigate to Appearance > Theme Options and click on Default Blog Layout tab.
Now you can select default layout for blog separately for Frontpage and Subpage.
You can select:
- 1 column, image centered: 1 recipe in a row
- 2 columns: 2 recipes in a row
- 3 columns: 3 recipes in a row
- 3 columns, with intro post: 3 recipe in a row + 1 intro recipe
- 1 column, image aligned left: 1 recipe in a row (image on the left, description on the right)
- 1 column, with movie: 1 recipe in a row (Youtube video on the left,description on the right). If recipe doesnt conatain Yotube link, there will be Featured Image displayed.
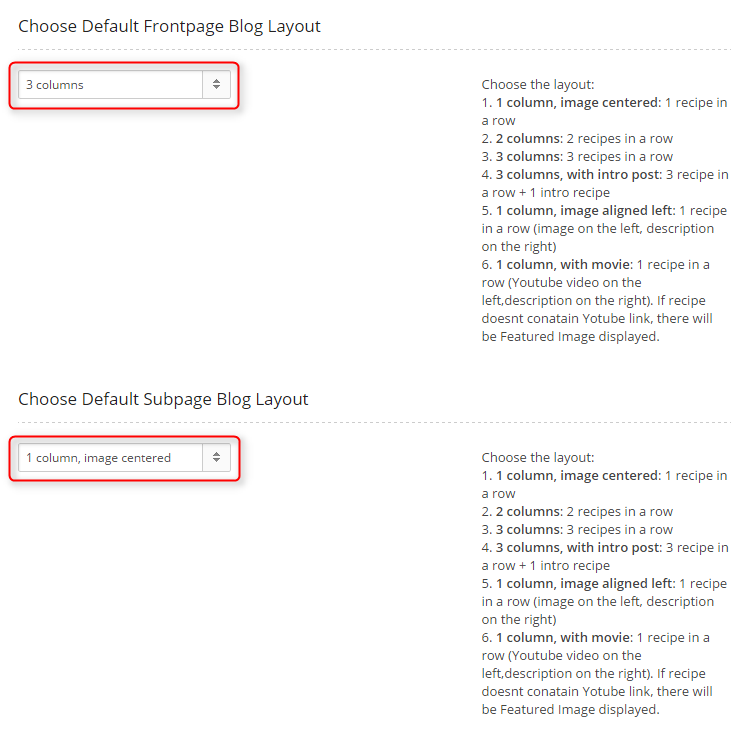
You can choose intro description limit and min-height for for boxes in blogs. Separately for 2 and 3 columns.

Click Save Changes when you are done.
7. Team Members
To setup Team Members options, navigate to Appearance > Theme Options and click on Team Members tab.
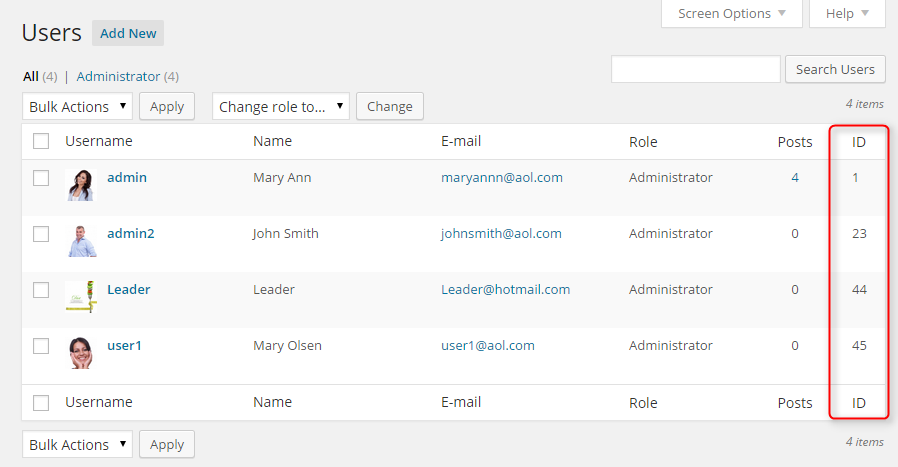
Enter ID of user that will be displayed on THE TEAM page as featured user.
Enter ID of user that will be displayed on ABOUT US page as intro.
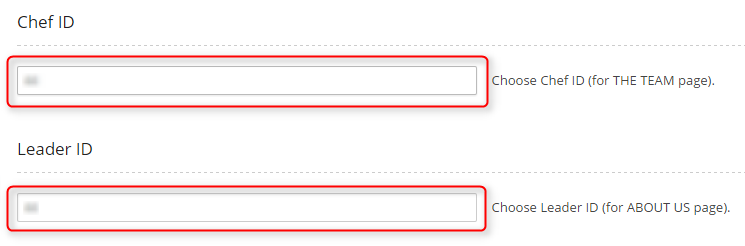
To check user ID, navigate to Appearance > Users and look at the last column.
Click Save Changes when you are done.
8. Background Colors
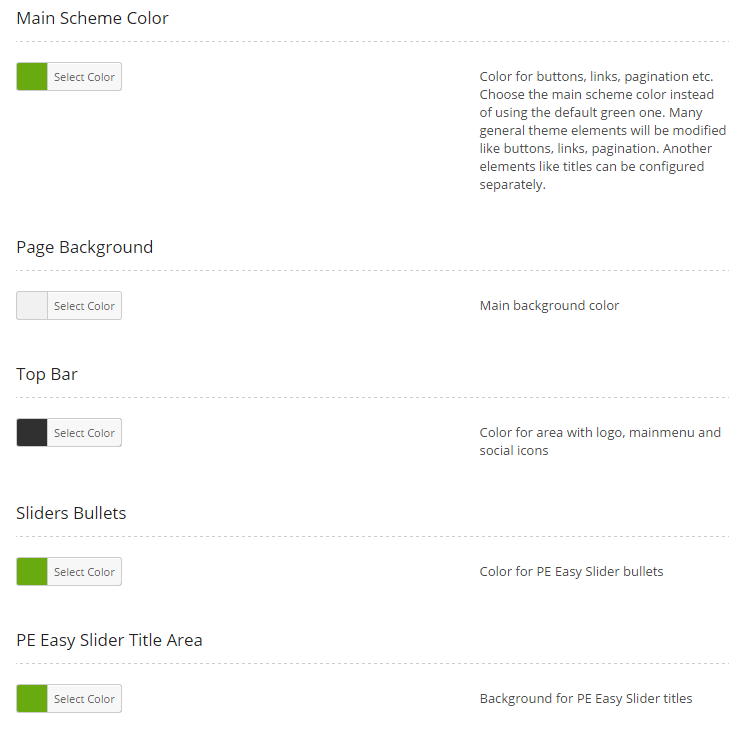
To setup Background Colors, navigate to Appearance > Theme Options and click on Background Colors tab.
You can choose here colors for many areas:
- Main Scheme Color: color for buttons, links, pagination etc.
- Page Background: main background color
- Top Bar: color for area with logo, mainmenu and social icons
- Sliders Bullets: color for PE Easy Slider bullets
- PE Easy Slider Title Area: background for PE Easy Slider titles
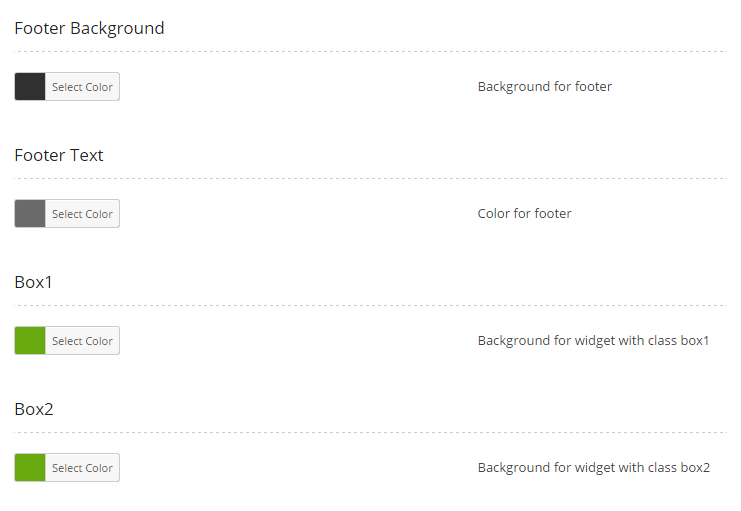
- Footer Background: background for footer
- Footer Text: color for footer
- Box1: background for widget with class box1
- Box2: background for widget with class box2
Click Save Changes when you are done.
9. Fonts
To setup Fonts, navigate to Appearance > Theme Options and click on Fonts tab.
You can add more fonts by clicking on Add Google Font button and then choose one of many fonts with additional options (font-weight, font-style, character sets)
You can change here typography for Body and Posts and Widgets.

Click Save Changes when you are done.
10. Footer
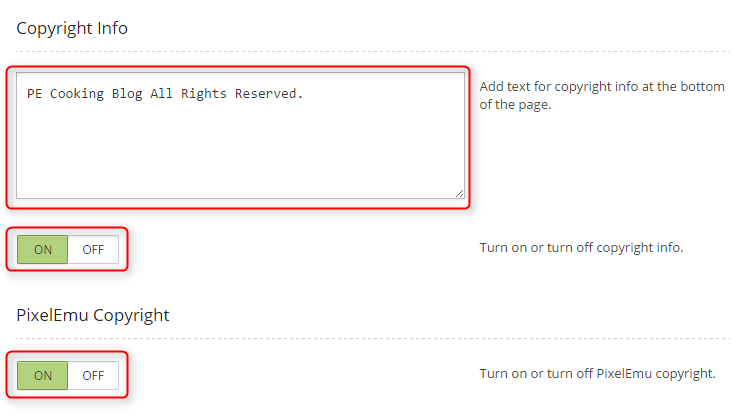
To setup Footer, navigate to Appearance > Theme Options and click on Footer tab.
You can enter here copright text.
Choose if you want to show your copyright text - click ON or OFF.
Choose if you want to show PixelEmu copyright - click ON or OFF.
Click Save Changes when you are done.
11. Advanced
To setup Advanced options, navigate to Appearance > Theme Options and click on Advanced tab.
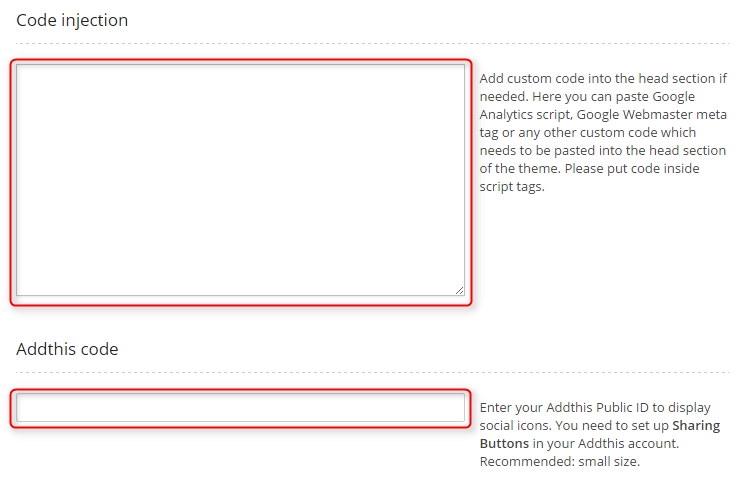
Paste your Google Analytics (or other) tracking code here. This will be added into the head section of your theme. Please put code inside script tags.
Enter your Addthis Public ID to display social icons. You need to set up Sharing Buttons in your Addthis account. Recommended: small size.
Click Save Changes when you are done.
C. HOME VIEWS
1. Static Image with Title and Description
You can use for header Static Image with Title and Description or Revolution Slider.
To setup Static Image with Title and Description navigate to Appearance > Widgets and add new Text widget to sidebar Header - static image with text
Add here you title and description like that:
                        <h1>Make Cooking Easier</h1>
                        <p>Best Cooking Blog Ever</p>
Then you should set image for this widget with these instructions.
2. Revolution Slider in Home View
Go to section Revolution Slider
3. Front End Content
You can apply different blog view for frontpage. See here.
You can also choose different layout for frontpage. See here.
To setup specific scheme of Revolution Slider on frontpage see here.
If you want to show Revolution Slider only on frontpage see here.
D. PAGES
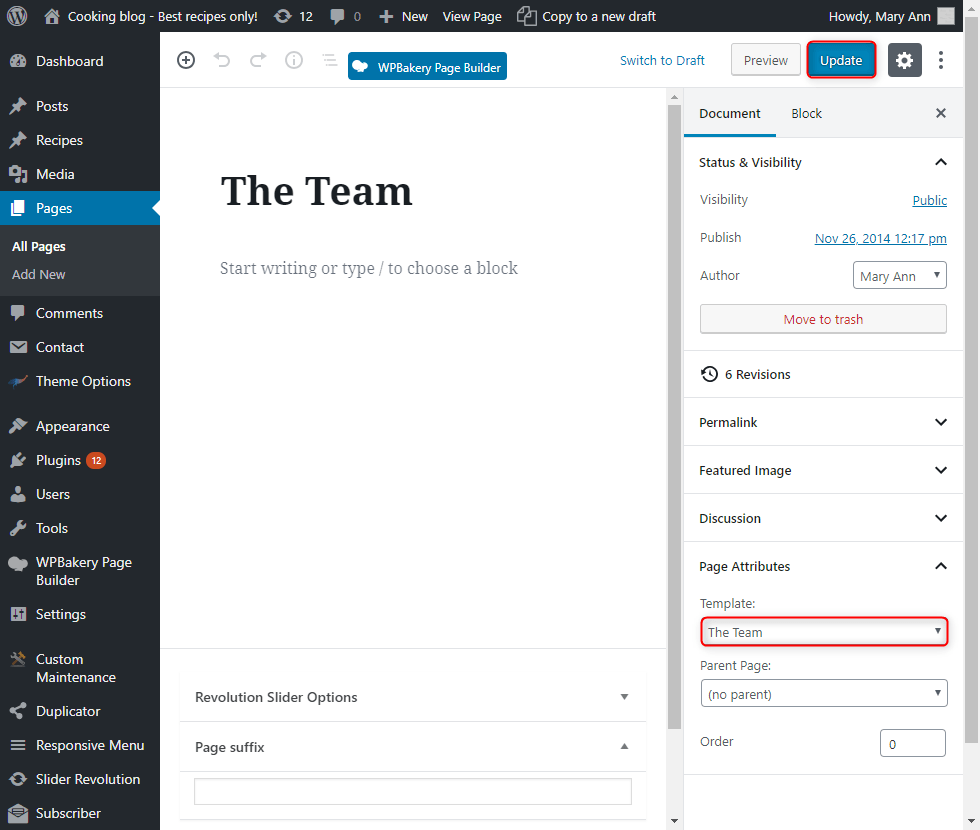
1. Configure TEAM page
This page displays webiste authors - users that create pages and recipes. To create that page go to Pages > Add New. Now select template The Team and click Update/Publish.
2. Configure About Us page
This page displays one user as featured item and all recipes. To create that page go to Pages > Add New. Now select template About Us and click Update/Publish.

3. Configure FAQ page
4. Setting Error 404 Page
This theme has special error 404 page. You must only be sure that server finds your 404 page. See here
5. Configure Advanced Search Page
This page displays advanced serach page where you can search recipes by name and filter them by cuisine, skill level, cook time etc. To create that page go to Pages > Add New. Now select template Advanced Search Page and click Update/Publish.

6. Configure Contact Form page
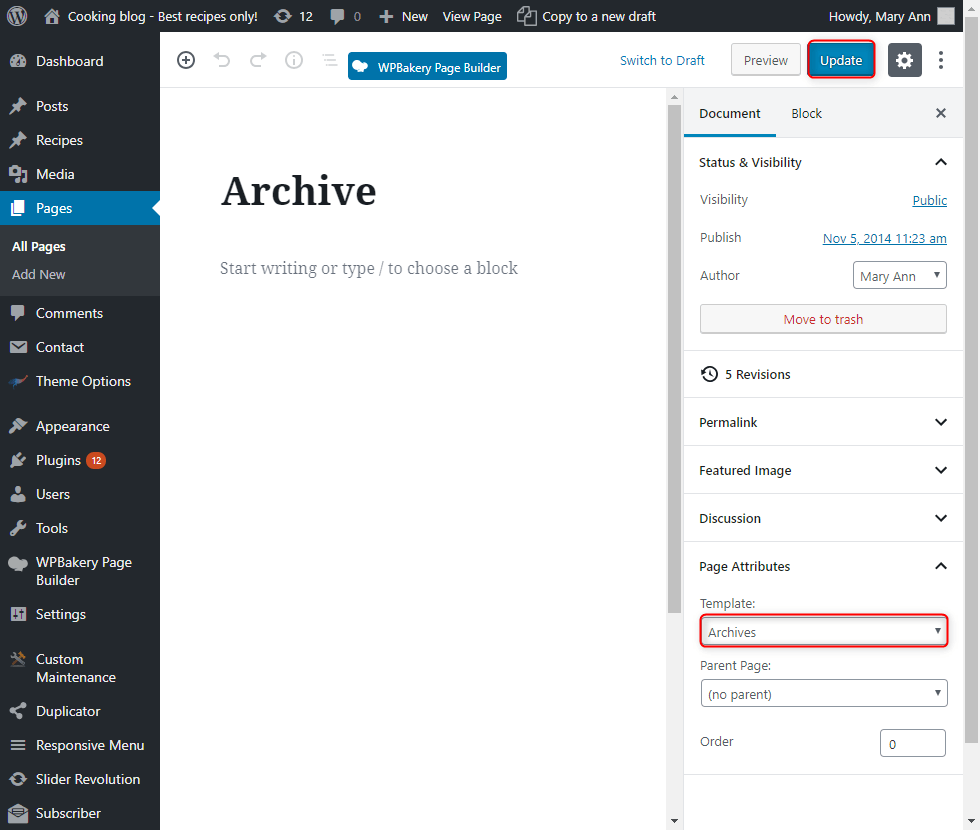
7. Configure Archive Page
This page displays last 30 recipes and recipe categories. To create that page go to Pages > Add New. Now select template Archives and click Update/Publish.
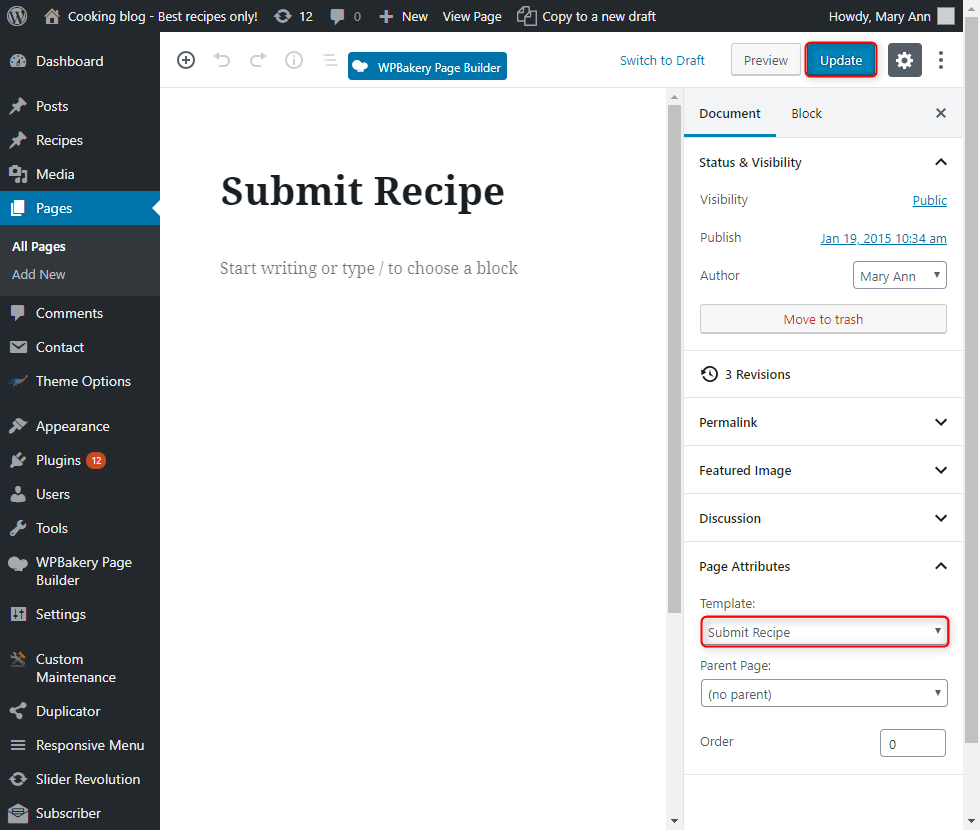
8. Configure Submit Recipe Page
This page displays form to add recipe from frontend. To create that page go to Pages > Add New. Now select template Submit Recipe and click Update/Publish.
E. PLUGINS & WIDGETS
1. Configure Social Icons
Just add Text widget to sidebar Social. Custom code for displaying social icons uses Awesome Fonts classes. Find more info about Awesome Fonts here http://demo.pixelemu.com/pe-cooking-blog/typography/

Now enter this:
<a class="facebook" href="#"><i></i></a><a class="twitter" href="#"><i></i></a><a class="google-plus" href="#"><i></i></a><a class="youtube" href="#"><i></i></a>
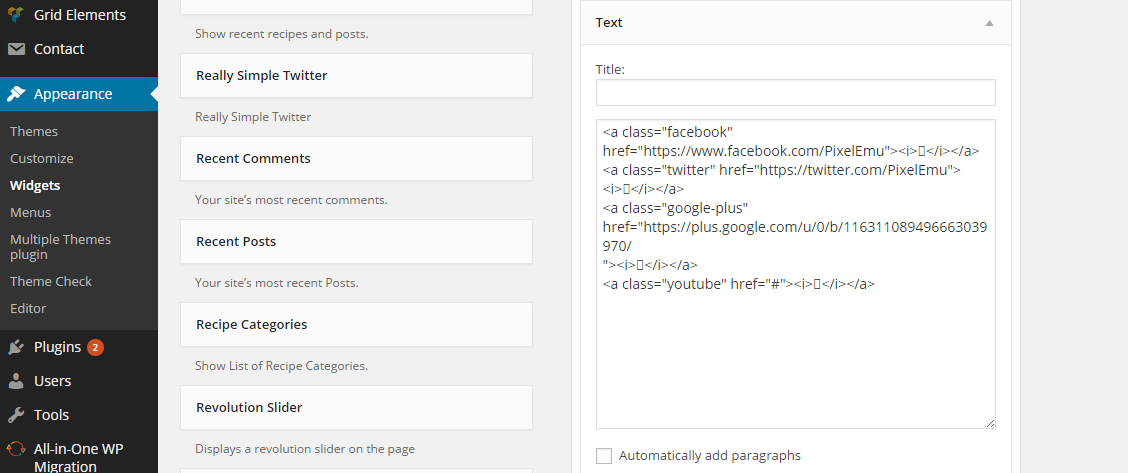
and click Save
2. PE Recent Posts
3. PE Easy Slider
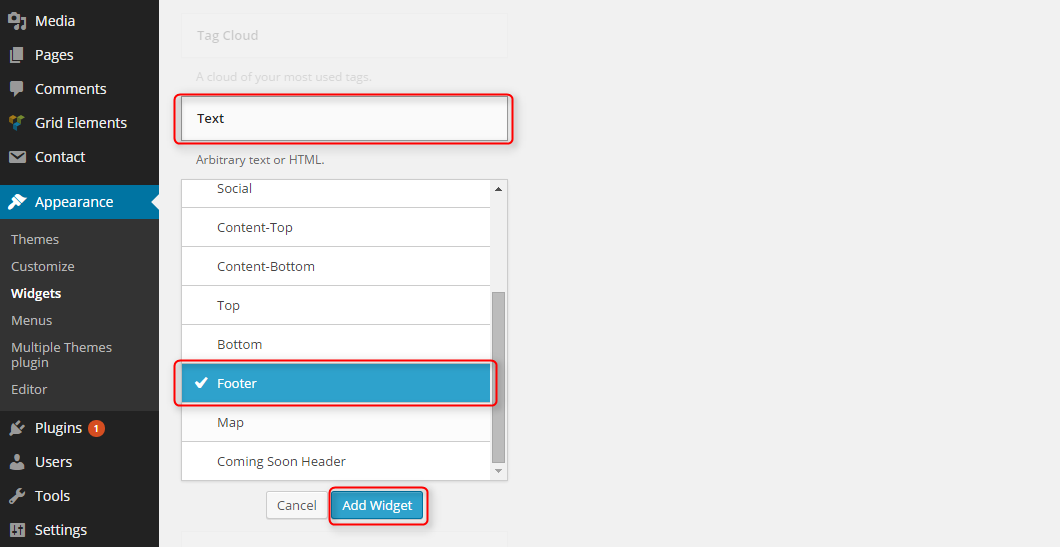
4. Configure About Me Text Widget
Add Text widget to sidebar Footer.
Add here text:
<img class="photo-img" src="http://ml.dev.pax3.eu/cookingblog/wp-content/uploads/2015/02/avatar1-small-min.jpg" alt="photo"><h3>Mary Ann</h3><p>Lorem ipsum dolor sit amet, consectetur adipisicing elit, sed </p><a class="readmore-author" href="/?page_id=274">read more <i></i></a>
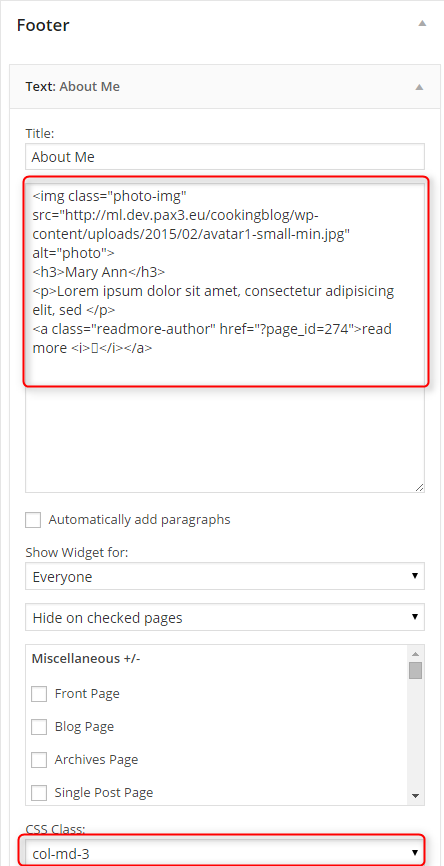
Choose class col-md-3 to display widget on 25% of theme width.
Click Save when you are done.
5. WPBakery Visual Composer
Very powerful plugin that allows you to create elements like tabs, accordions etc. on your page without coding knowledge. See documentation.
6. Revolution Slider
7. Contact Form 7
You can create exmaple form like on our demo site by navigating to Contact > Add New. Now go put this code in FORM section:
<div class="name-email clearfix"><p>[text* your-name placeholder "Name"] </p><p>[email* your-email placeholder "E-mail"] </p></div><p>[textarea your-message placeholder "Message"] </p><p class="submit-right">[submit "Send"]</p>
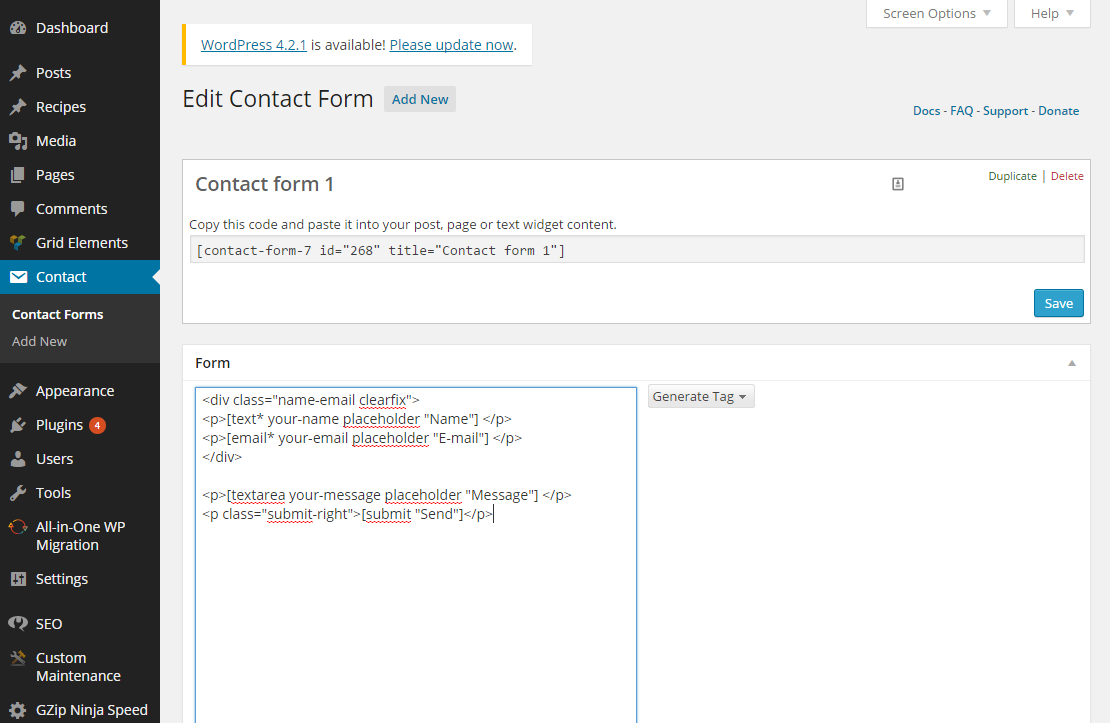
and click Save.
Now you can copy code in section Copy this code and paste it into your post, page or text widget content. and place it you page.
8. Custom Maintenance Mode
You can use this plugin to set maintance mode page for you website. Go to Custom Maintenance. Now tick Enable For Maintenance Mode? and choose WP Page as source. Then select page that you want to use in mainatnce mode.
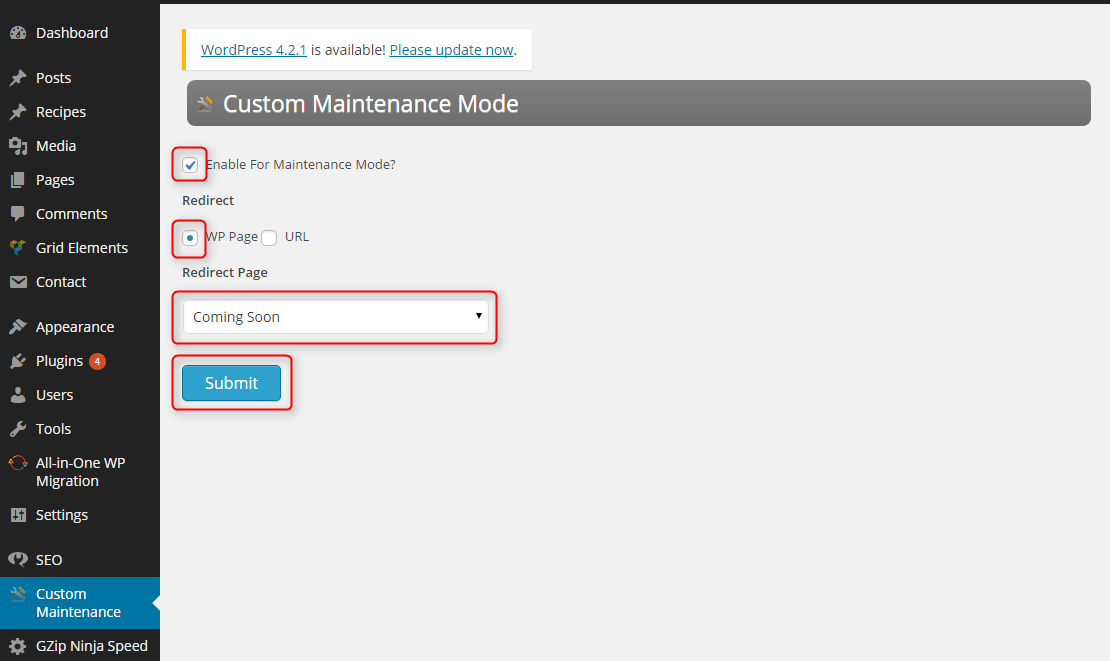
Click Save when you are done.
9. Really Simple Twitter Feed Widget
To use this plugin you need to get Consumer Key, Consumer Secret, Access Token and Access Token Secret from https://apps.twitter.com/.
To show Really Simple Twitter Feed Widget on your website navigate to Appearance > Widgets and add new Really Simple Twitter Feed Widget to sidebar Primary Widget Area.
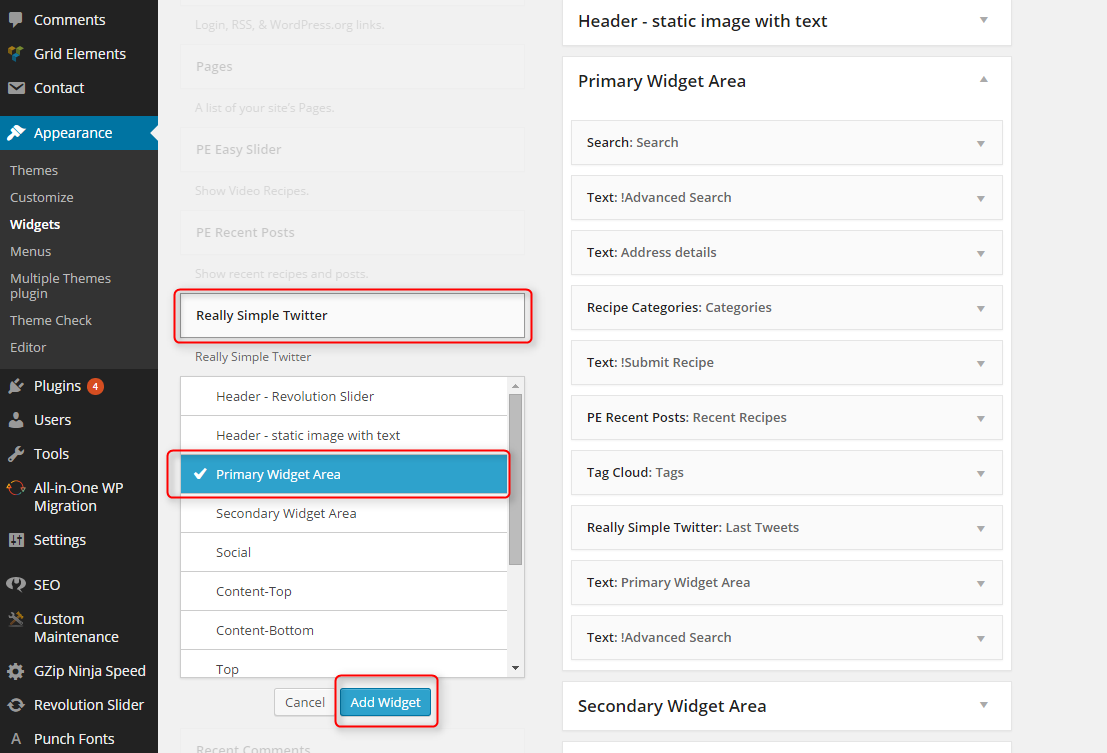
Now enter Consumer Key, Consumer Secret, Access Token, Access Token Secret and Twitter username. Rest of options is optional.
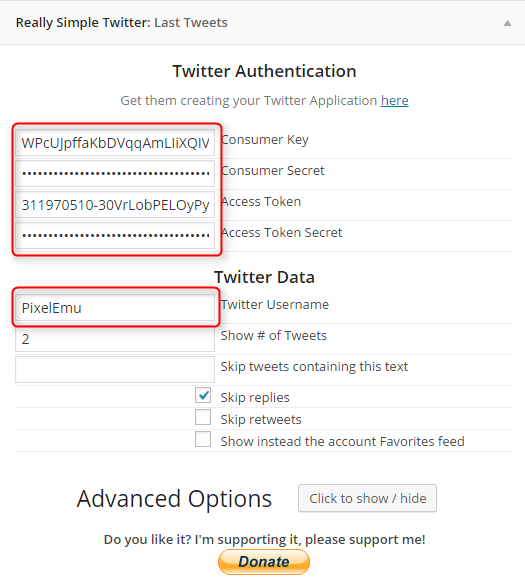
Click Save when you are done.
10. Responsive Google MAP
To show Responsive Google MAP on your website navigate to Appearance > Widgets and add new Responsive Google MAP to sidebar Map.
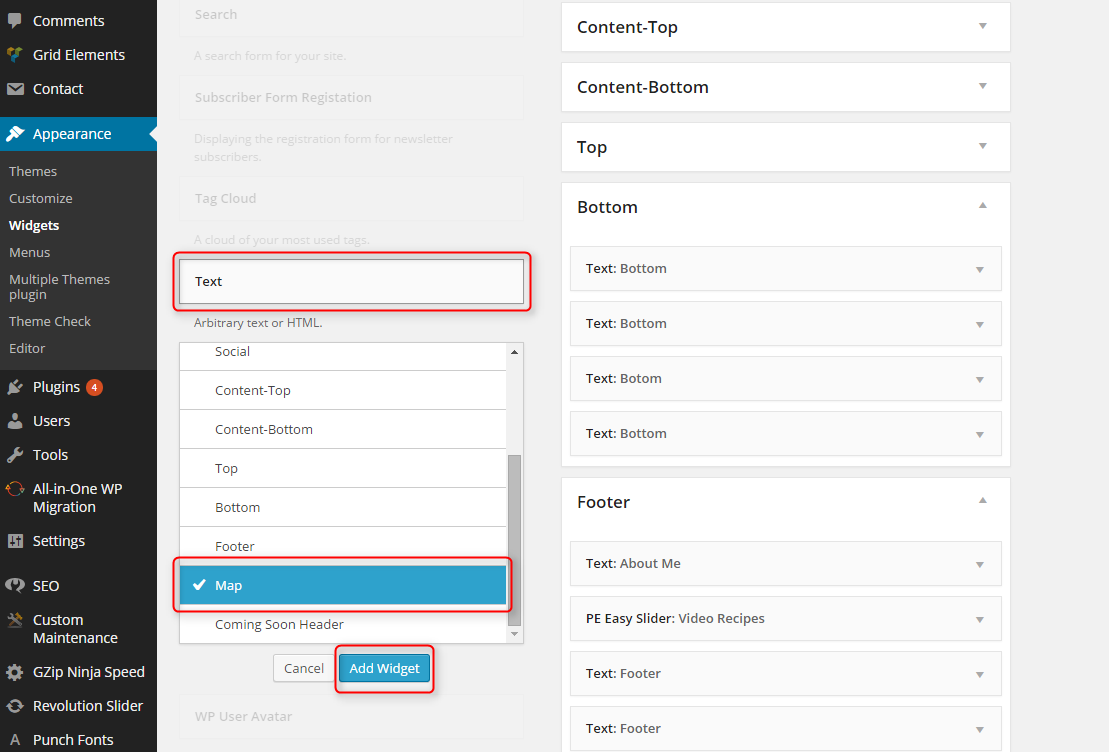
Then enter code like this:
[om_gmap zoom="9" lat="51.520311" lng="-0.131124" infowindow=""]
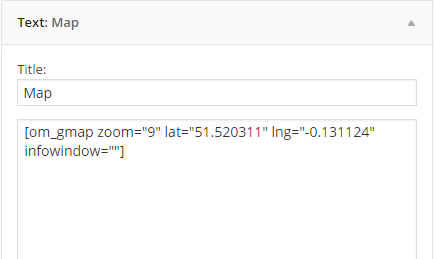
zoom: zoom level
lat: latitude
lng: longitude
Click Save when you are done.
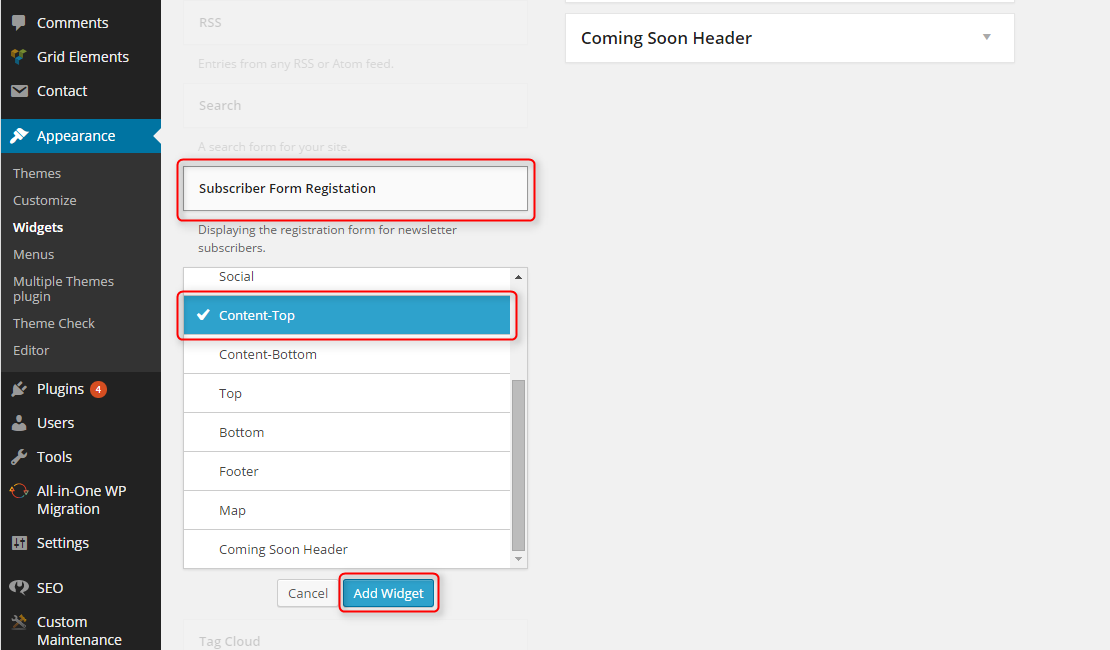
11. Subscriber
To show Subscriber on your website navigate to Appearance > Widgets and add new Subscriber Form Registration to sidebar Content-Top.
Enter any text values in widget options.
Important is to choose class newsletter to display widget like on our demo site.
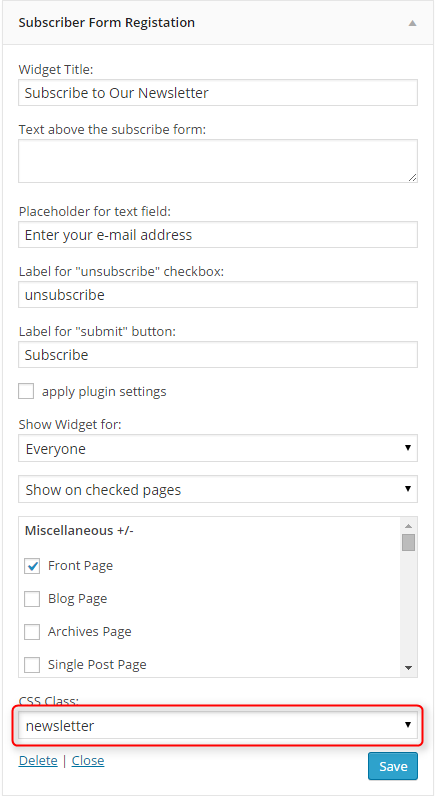
Click Save when you are done.
12. Display Widgets
13. WP User Avatar
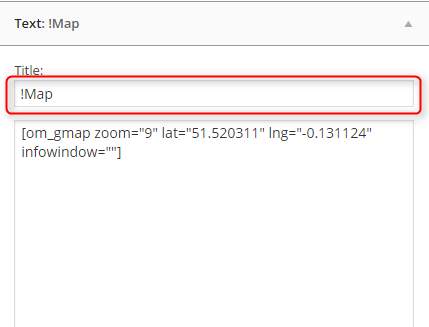
14. Remove Widget Titles
Simple plugin that allows to remove widget title by enetring ! before widget title.
15. Widget CSS Classes
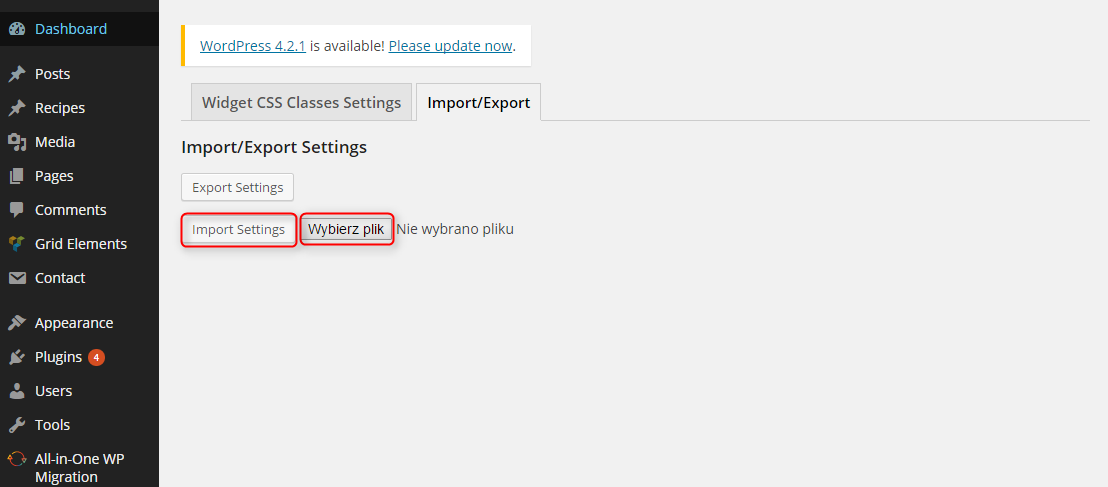
To import classes go to Plugins and then click Settings below Widget CSS Classes.
Now go to tab Import/Export, choose file widget-css-classes-settings.txt from package and click Import Settings.
At the bottom of widgets you can apply special class.

There are standard classes from Bootstrap, ex. col-md-3 (widget has width: 3/12), col-md-5 (widget has width: 5/12). There are also classes for Subscriber and box1, box2 (see Custom Pages > Typography on demo site).
16. WordPress SEO
The theme is compatibile with Yoast plugin. See documentation.
17. Duplicate Post
Plugin that adds extra option in quick menu. You can duplicate posts and recipes.

18. Responsive Menu
Plugin that displays impressive mobile menu with many options. If you want to get menu look like in our demo plese import JSON file. Navigate to Responsive Menu and click on tab Import/Export.

Now choose responsive-menu.json and click Import Options.

19. PE Social
Built-in widget which allows you to display social icons.


On demo page, widget is visible in the 'social' sidebar.
We have also a video tutorial on how to configure the PE Social widget:
F. ADDING CONTENT
1. Add Post
2. Add Page
3. Add recipe
Navigate to Recipes > Add New. Enter title, description and click Publish. Optionally you can choose options like recipe category, cuisine, skill level etc.

To get recipe layout like on our demo site you should create tabs following this and then create structure based on DIV elements with shortcodes. The best option for begginers is to place ready example code in text editor.
If you are not in Classic Mode click Classic Mode button to change it (you will see Backend Editor instead). Then click tab Text and paste example code.
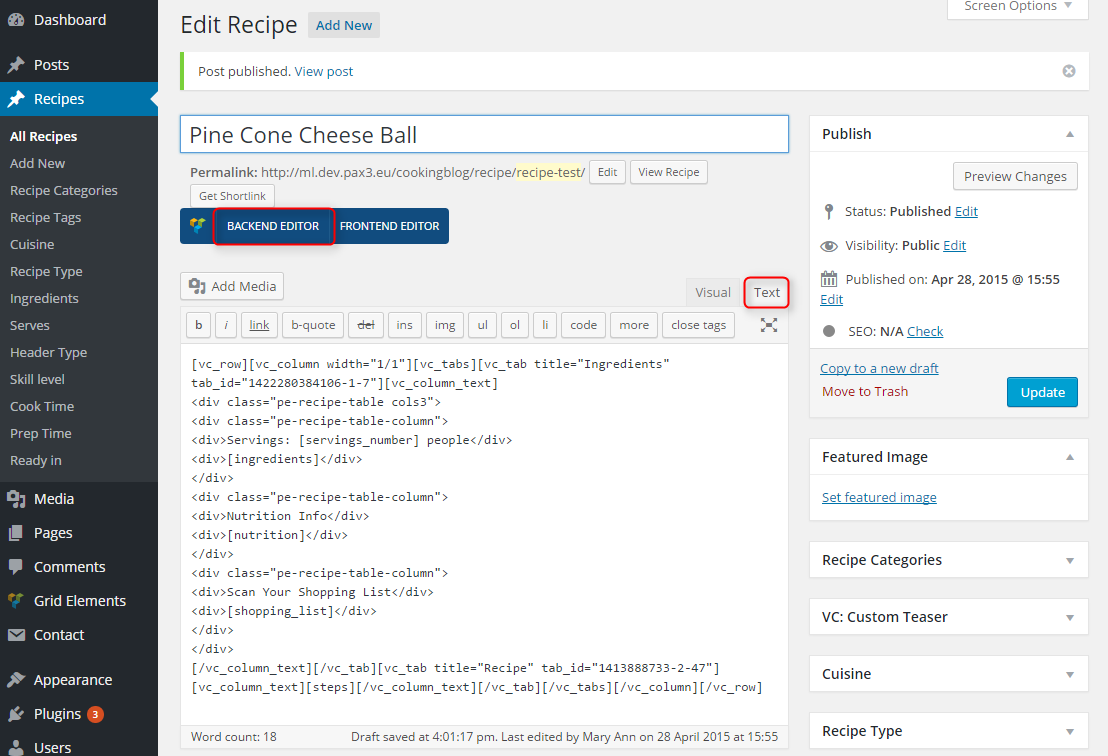
[vc_row][vc_column width="1/1"][vc_tabs][vc_tab title="Ingredients" tab_id="1422280384106-1-7"][vc_column_text]
<div class="pe-recipe-table cols3">
<div class="pe-recipe-table-column">
<div>Servings: [servings_number] people</div>
<div>[ingredients]</div>
</div>
<div class="pe-recipe-table-column">
<div>Nutrition Info</div>
<div>[nutrition]</div>
</div>
<div class="pe-recipe-table-column">
<div>Scan Your Shopping List</div>
<div>[shopping_list]</div>
</div>
</div>
[/vc_column_text][/vc_tab][vc_tab title="Recipe" tab_id="1413888733-2-47"][vc_column_text][steps][/vc_column_text][/vc_tab][/vc_tabs][/vc_column][/vc_row]
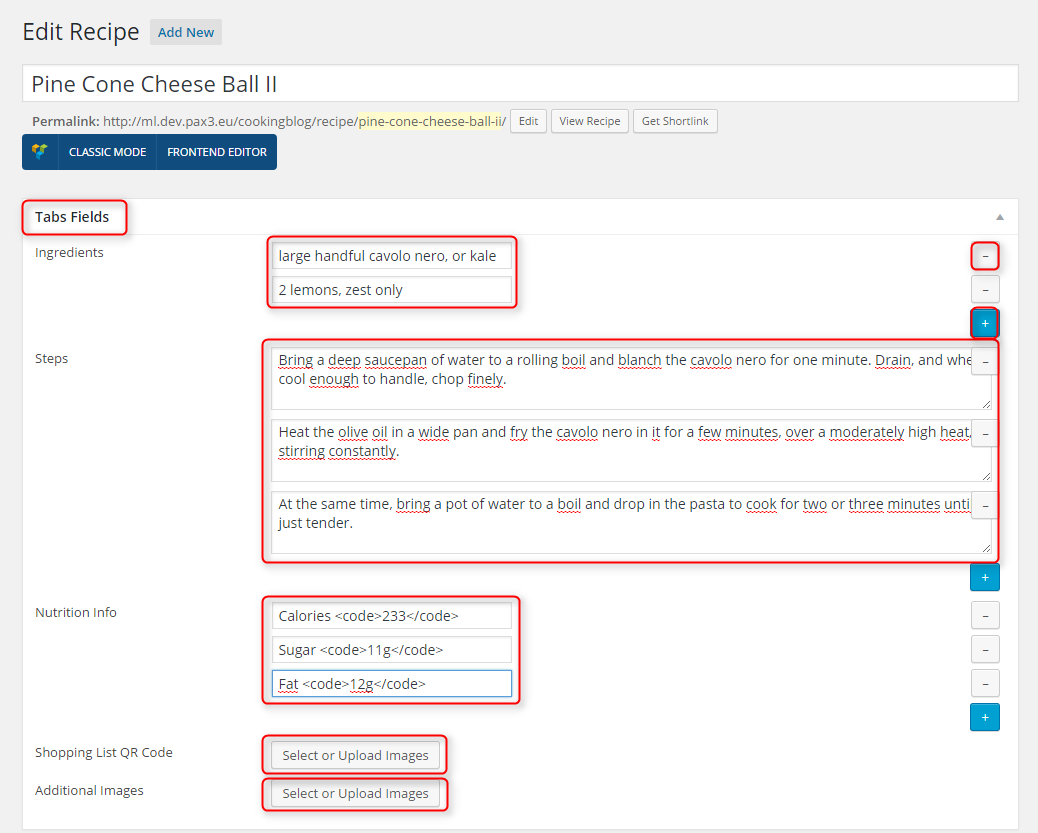
and then enter info needed by used shortcodes in tab Tab Fields. You can add or remove fields by using buttons + or -.
You can also add info without using Tab Fields and shortcodes. Just enter all info in code:
[vc_row][vc_column width="1/1"][vc_tabs][vc_tab title="Ingredients" tab_id="1413888733-1-24"][vc_column_text]
<div class="pe-recipe-table cols3">
<div class="pe-recipe-table-column">
<div>Servings: 2 people</div>
<div>
<ul>
    <li>large handful cavolo nero, or kale</li>
    <li>100ml/3½fl oz olive oil</li>
    <li>2 lemons, zest only</li>
    <li>½ lemon, juice only</li>
    <l>200g/7oz cooked chickpeas</li>
    <li>500g/1lb 2oz fresh tagliatelle pasta, or similar</li>
    <li>salt</li>
    <li>freshly ground black pepper</li>
    <li>100g/3½oz pecorino or other hard cheese, finely grated</li>
</ul>
</div>
</div>
<div class="pe-recipe-table-column">
<div>Nutrition Info</div>
<div>
<ul class="dott">
    <li>Calories <code>251</code></li>
    <li>Sugar <code>11g</code></li>
    <li>Fat <code>12g</code></li>
    <li>Saturates <code>45g</code></li>
    <li>Salt <code>0.6g</code></li>
</ul>
</div>
</div>
<div class="pe-recipe-table-column">
<div>Scan Your Shopping List</div>
<div><img src="http://ml.dev.pax3.eu/cookingblog/wp-content/uploads/2014/10/qr-example.png" alt="qr" /></div>
</div>
</div>
[/vc_column_text][/vc_tab][vc_tab title="Recipe" tab_id="1413888733-2-47"][vc_column_text]
<h2>Step 1</h2>
Bring a deep saucepan of water to a rolling boil and blanch the cavolo nero for one minute. Drain, and when cool enough to handle, chop finely.
<h2>Step 2</h2>
Heat the olive oil in a wide pan and fry the cavolo nero in it for a few minutes, over a moderately high heat, stirring constantly.
<h2>Step 3</h2>
At the same time, bring a pot of water to a boil and drop in the pasta to cook for two or three minutes until just tender.
<h2>Step 4</h2>
Drain the pasta and stir it into the kale with the lemon zest and juice, the chickpeas and half of the grated pecorino. Season, to taste, with salt and freshly ground black pepper.
<h2>Step 5</h2>
Serve the pasta in deep bowls with more cheese scattered over.
[/vc_column_text][/vc_tab][/vc_tabs][/vc_column][/vc_row]
G. RECIPE OPTIONS
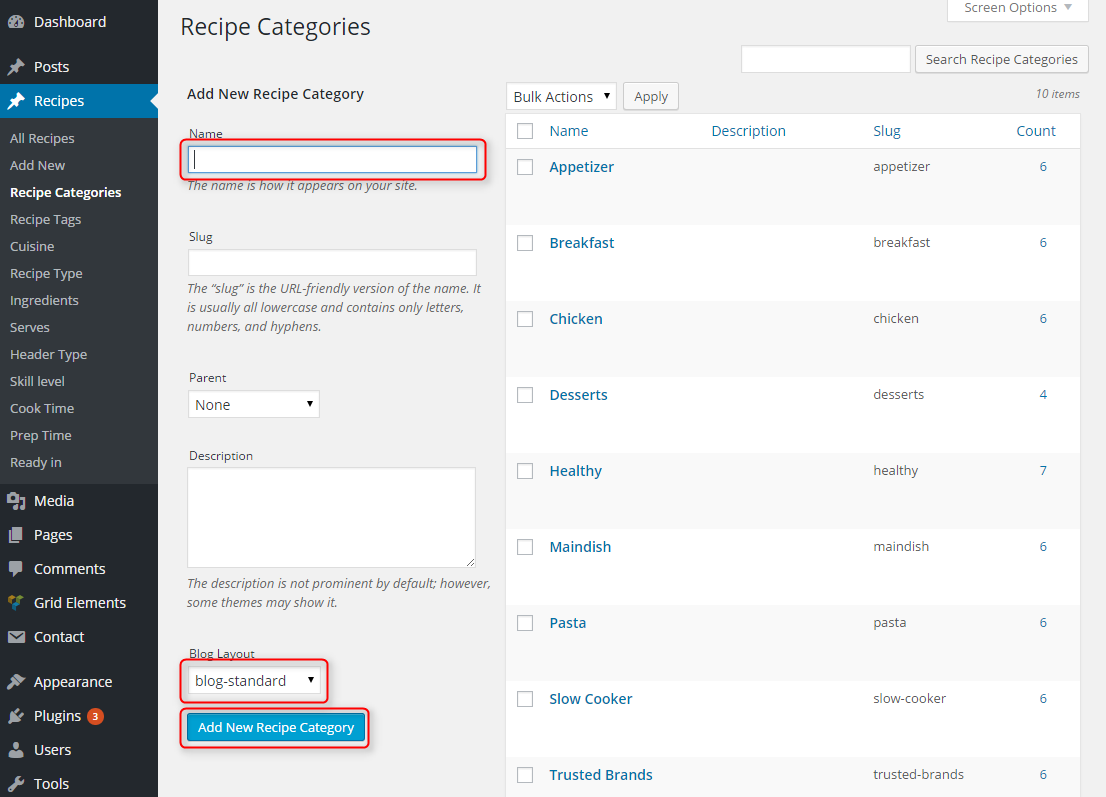
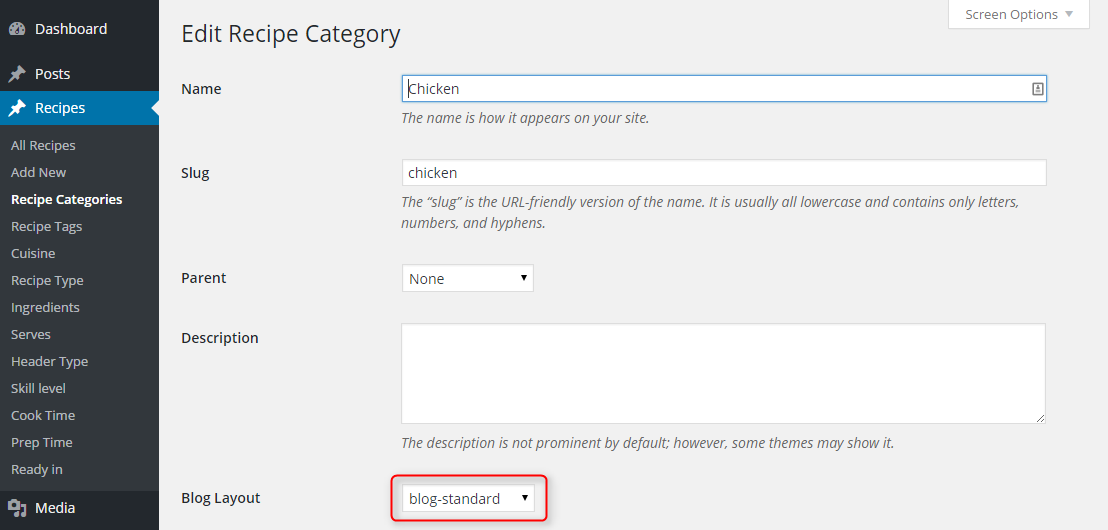
1. Recipe Categories
Navigate to Recipes > Recipe Categories. Now choose name of the category, blog layout and click Add new recipe category.
2. Configure Blog Layout for Specific Recipe Category
You can choose how to display recipes in blog. Select one of them:
- blog-standard: 1 column, image centered
- blog-2cols: 2 columns
- blog-3cols: 3 columns
- blog-intro-3cols: 3 columns, with intro post
- blog-image-left: 1 column, image aligned left
- blog-video: 1 column, with movie
3. Youtube Video Url
This is special field in recipe that allow you to display Youtube Video instead of Featured Image.
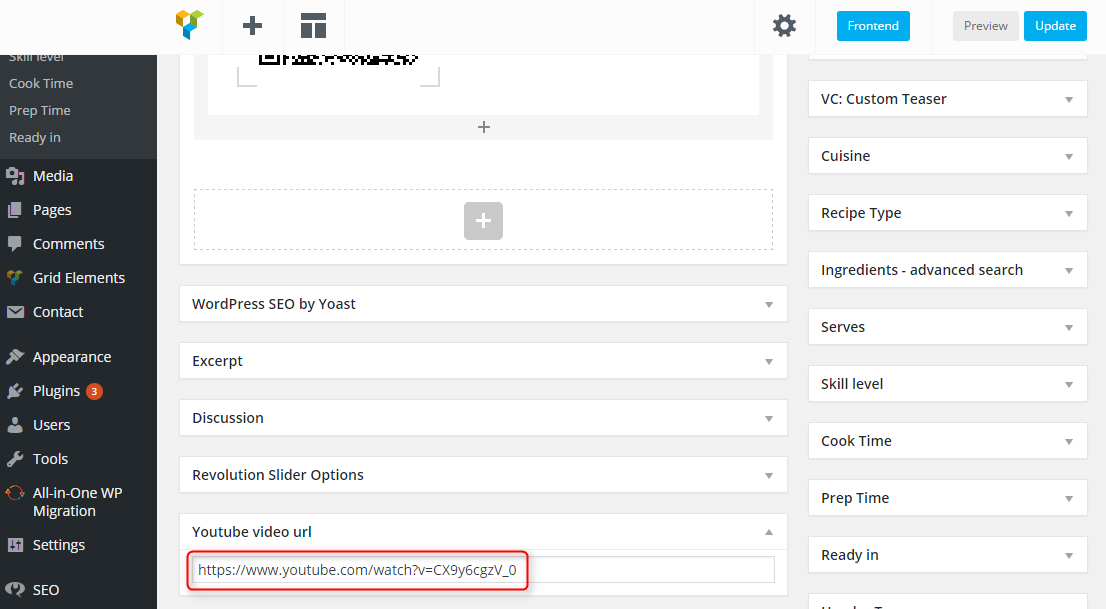
If you want to display Youtube Video instead of Featured Image change Header Type to video.
4. Recipe Tags
Tags for recipes only.
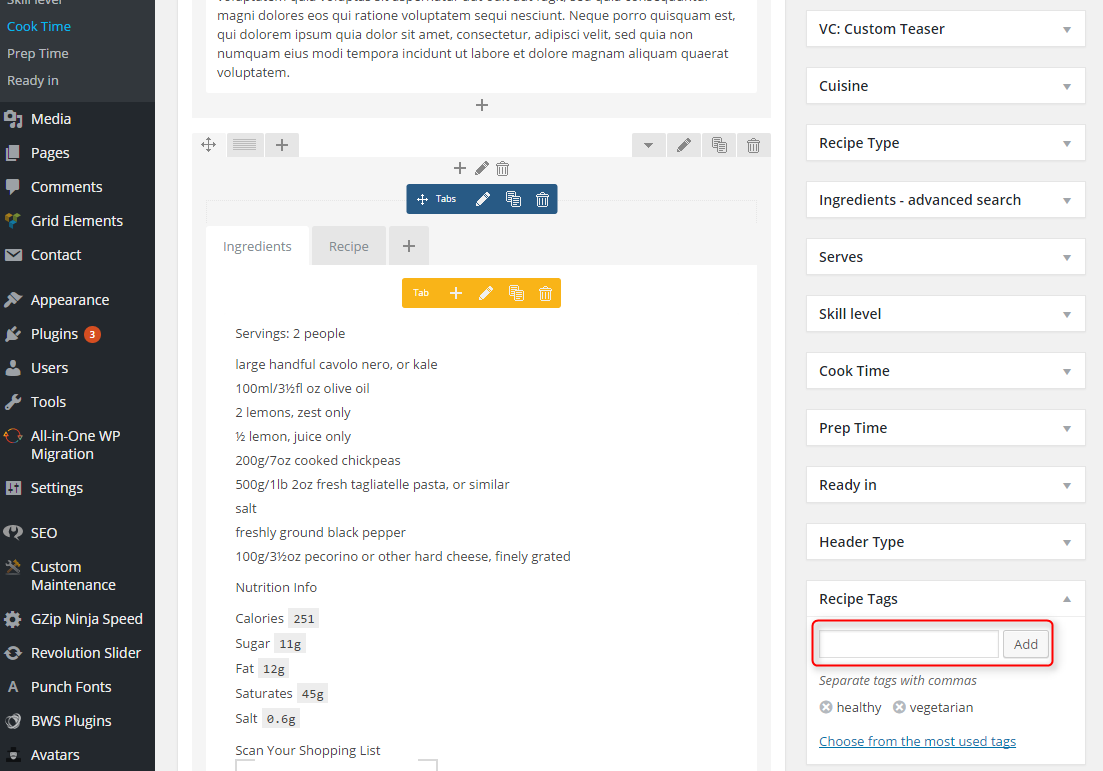
You can add more tags by go to Recipes > Recipe Tags.
5. Cousine
Special taxonomy for cusine, ex. american, european.
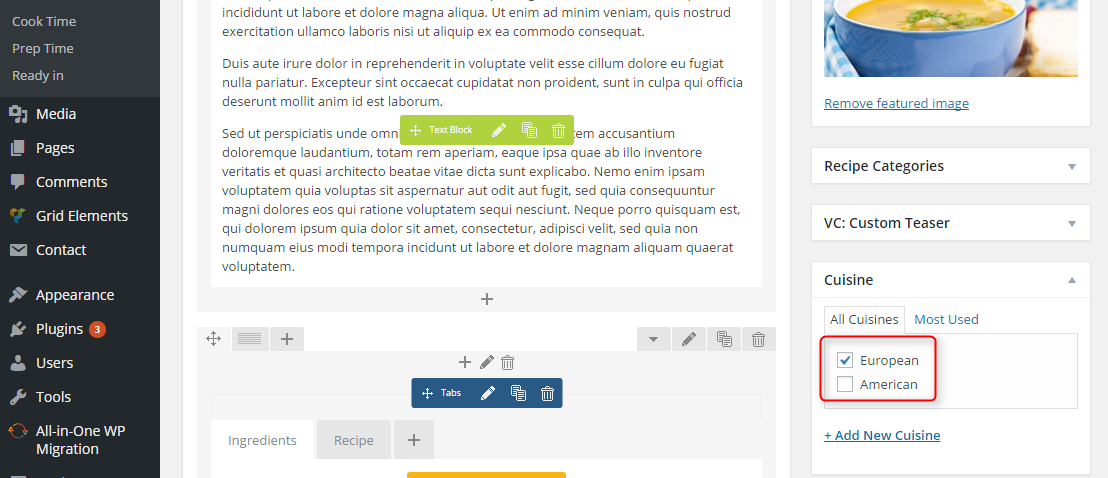
You can add more tags by go to Recipes > Cuisine.
6. Recipe Type
Special taxonomy for recipe types, ex. breakfast, lunch, dinner.

You can add more tags by go to Recipes > Recipe Type.
7. Ingredients
Special taxonomy for ingredients, ex. salt, chicken, pepper.
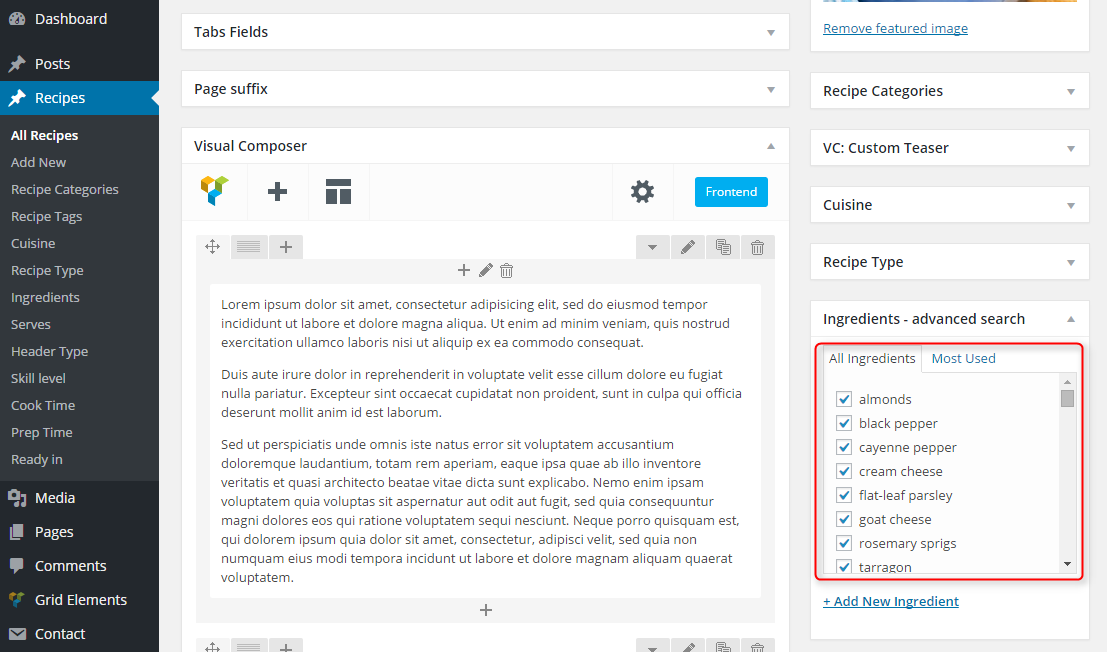
You can add more tags by go to Recipes > Ingredients.
This taxonomy is used in page Advanced Search.
8. Serves
Special taxonomy for serves, ex. 1,2,3,4.

You can add more tags by go to Recipes > Serves.
9. Skill Level
Special taxonomy for skill level, ex. easy, hard.

You can add more tags by go to Recipes > Skill Level.
10. Cook Time
Special taxonomy for cook time, ex. 0:10h, 0:20h.
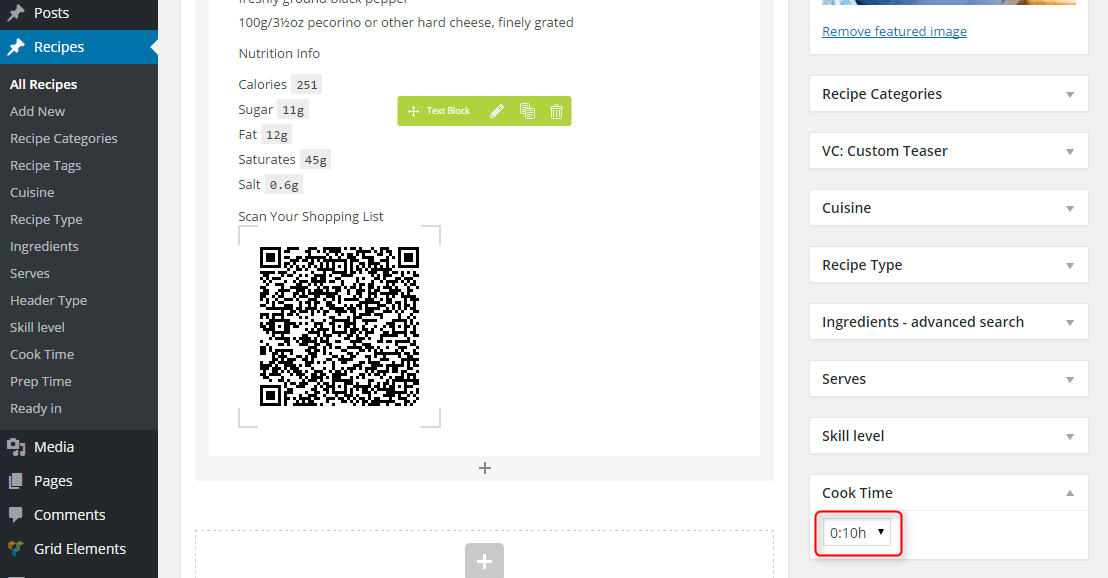
You can add more tags by go to Recipes > Cook Time.
11. Prep Time
Special taxonomy for prep time, ex. 0:10h, 0:20h.

You can add more tags by go to Recipes > Prep Time.
12. Ready In
Special taxonomy for ready in, ex. 0:10h, 0:20h.

You can add more tags by go to Recipes > Ready In.
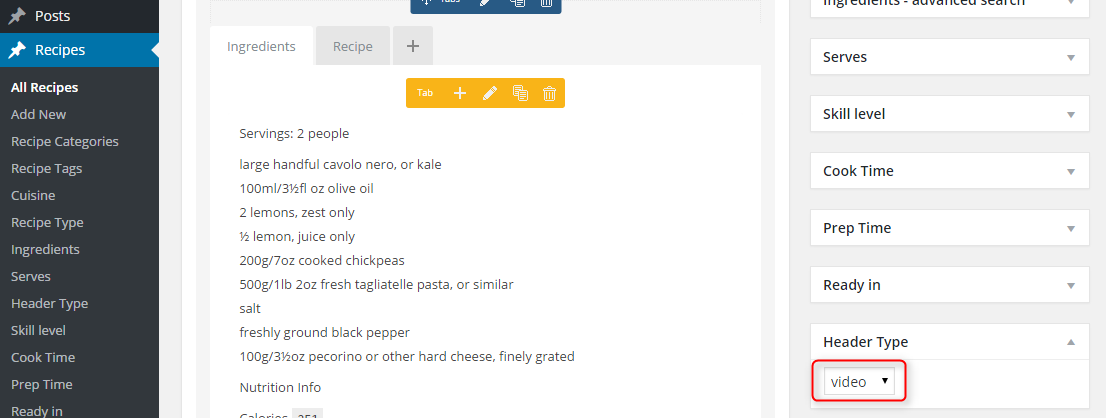
13. Header Type (Image or Video)
If you want to display Youtube Video instead of Featured Image change Header Type to video.
If you want to display Featured Image choose image. When you don't select anything Featured Image will be displayed.
H. WPML
1. Purchase WPML
2. Initial Setup
3. Translating Pages, Posts and other post types
4. Translating custom post types
5. Translating theme texts and other strings
I. OTHER
1. Create suffix for posts, recipes and pages
If you want to style certain page, post or recipe you can add special class.
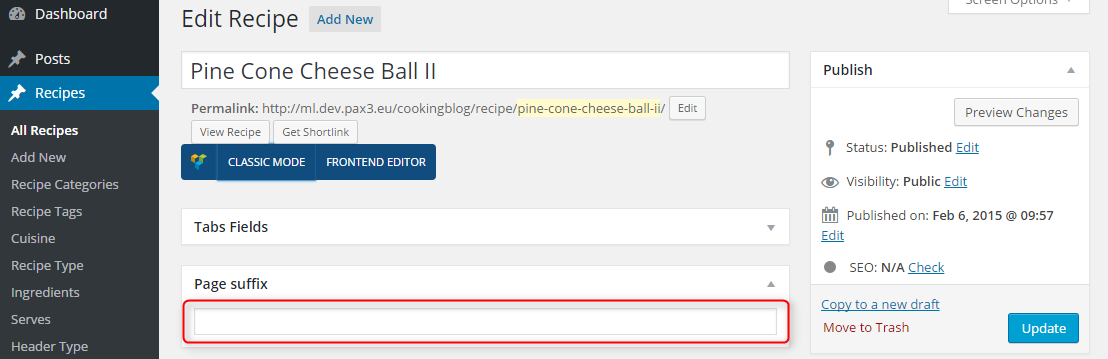
Class will be added here:

2. Bootstrap classes to specify each widget width
3. Responsive Utilities
J. OPTIMIZE YOUR SITE
K. SOURCES AND CREDITS
- Homepage Image http://www.dreamstime.com/royalty-free-stock-photos-young-couple-enjoying-meal-image6880508
- All-in-One WP Migration (Migration tool for all your blog data. Import or Export your blog content with a single click.) https://servmask.com/
- Contact Form 7 (Just another contact form plugin. Simple but flexible.) https://ideasilo.wordpress.com/
- Custom Maintenance Mode (You can easily create a maintenance mode) http://www.wpsuperplugin.com/
- Display Widgets (Adds checkboxes to each widget to show or hide on site pages.) http://strategy11.com/
- Duplicate Post (Clone posts and pages.) http://lopo.it/
- W3 Total Cache http://www.linkedin.com/in/w3edge
- jonradio Multiple Themes (Select different Themes for one or more WordPress Pages, Posts or other non-Admin pages. Or Site Home.) http://jonradio.com/plugins
- Meta Box (Create meta box for editing pages in WordPress. Compatible with custom post types since WP 3.0) http://www.deluxeblogtips.com/
- Really Simple Twitter Feed Widget (Displays your public Twitter messages in the sidbar of your blog. Simply add your username and all your visitors can see your tweets!) http://www.whiletrue.it/
- Remove Widget Titles (Removes the title from any widget that has a title starting with the "!" character.) http://www.scratch99.com/
- Responsive Google MAP (Responsive Google MAP, Anywhere.) http://webomnizz.com/blog
- Revolution Slider (Revolution Slider - Premium responsive slider) http://themepunch.com/
- Subscriber by BestWebSoft (This plugin allows you to subscribe users on newsletter from your website.) http://bestwebsoft.com/
- Widget CSS Classes (Add custom, first, last, even, odd, and numbered classes to your widgets.) http://cleverness.org/
- WordPress SEO (The first true all-in-one SEO solution for WordPress, including on-page content analysis, XML sitemaps and much more.) https://yoast.com/
- WPBakery Visual Composer (Drag and drop page builder for WordPress. Take full control over your WordPress site, build any layout you can imagine – no programming knowledge required.) http://wpbakery.com/
- WP User Avatar (Use any image from your WordPress Media Library as a custom user avatar. Add your own Default Avatar.) http://www.flippercode.com/
- WordPress Importer https://profiles.wordpress.org/wordpressdotorg/
- Responsive Menu http://www.peterfeatherstone.com/wordpress/responsive-menu/
- OptionTree https://github.com/valendesigns/option-tree-theme