Eco Energy WordPress theme tutorials
Manage Eco Energy WordPress theme with ease.
We've prepared a set of tutorials for Eco Energy WCAG ready WordPress theme. Browse the topics from the menu on the right side and follow instructions and find out more interesting features that this awesome WordPress theme brigs you.
The following tutorials are the extended guides for sections described in the Energy WordPress theme manual available online or downloadable at your account (for active subscribers of Eco Energy WordPress theme).
How to find a WordPress widget easily in the Eco Energy WordPress theme?
Please follow the general tutorials related to this topic:
- How to find a WordPress widget easily?
- Watch the video about the simplest way to find the sidebar names and the widget type you want to customize.
How to change the logo and menu position in the Eco Energy WordPress theme settings?
You can easily change the position of the logo and menu in the Eco Energy WordPress theme. The default view used for the demo site uses a centered menu and logo.
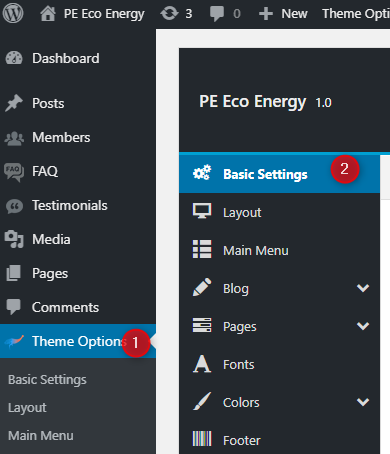
Let’s check the possible options. Log-in to your WordPress website backend. Go to "Theme Options" and navigate to the "Main Menu" on the list.
![]()
Now you can define the “Menu position” setting depending on your needs.
![]()
Three options are available to choose:
- Center menu and logo
- Menu on right / logo on left
- Menu on left / logo on left
The default view for Eco Energy WordPress theme demo looks like this (It’s the center menu and logo):
![]()
The view with Menu on right / logo on left looks like this:
![]()
And the view with Menu on left / logo on left looks like this:
![]()
How to manage WordPress theme's menu links?
See how to add a link to the menu in WordPress. Menus in WordPress may contain links to pages, categories, custom links, or other content types.
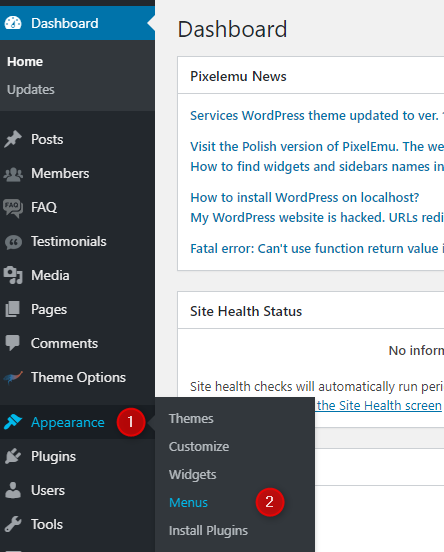
Log into your WordPress administration panel. Navigate to Appearance, and select Menus:
Now let’s add a new menu item.
Choose (for example) the “Custom link” from the list. Type in the URL you want to have for this menu button, the link text, and then click Add to Menu:

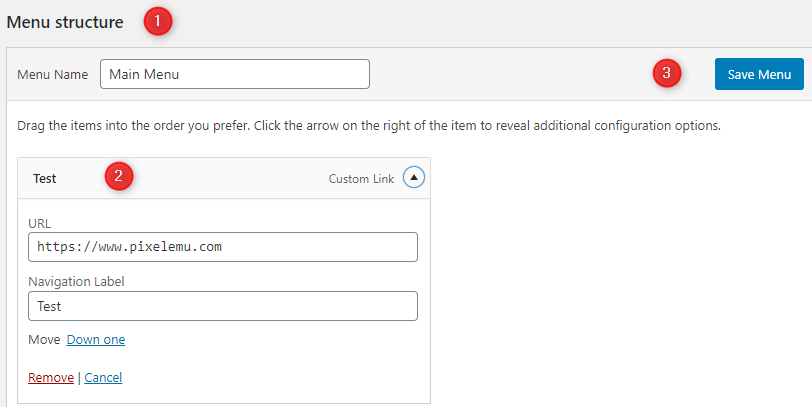
As you can see in the screenshot below, the new menu item appears on the Menu structure (1). It’s on the top because I’ vee used the “To the top” button for a better view here. The “Test” item (2) can still be edited so that you can change the name and the link. Don’t forget to use the “Save menu” button (3).
This way, you can create and manage all menu items. You can also move items up and down to change their order.
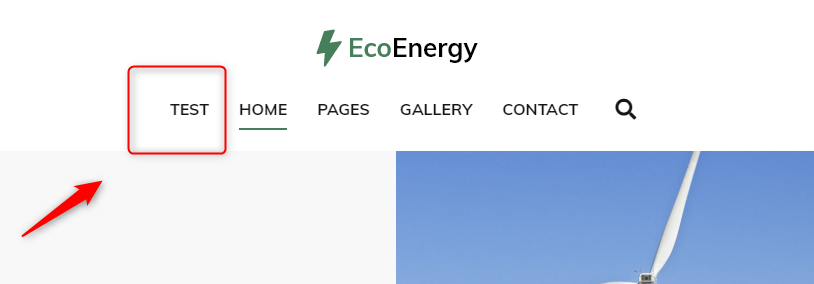
Refresh the site, and you will see your new custom page and link in the navigation menu. Below see the final effect on the front page:
How to manage WCAG tools icons in the Eco Energy WordPress theme?
Using web accessibility tools enable you to easily follow the Web Content Accessibility Guidelines (WCAG) across all conformance levels.
WCAG tools icons are available at the top-right corner of the Eco Energy WordPress theme demo site.
![]()
Click on the icon, and a box will open with a set of options to use. These tools will help visually disabled website visitors to navigate across the website.
![]()
Options used for this demo site are divided into three main categories:
- Contrast
- Layout
- Font
But it’s only an example. The content of this box can be easily defined in the backend of the website.
Go to your WordPress admin panel. Navigate to “Theme Options” and then to “WCAG & ADA.”
![]()
Now you have a massive number of available accessibility settings to configure. The ones you see in the WCAG tools box are:
- Wide layout (Enable / disable wide layout.)
- Font sizer (Enable / disable font sizer.)
- Night mode (Enable / disable night mode.)
- (High contrast mode)
But there are also other WCAG settings that you may also manage. Check here the detailed description of each WCAG settings section.
![]()
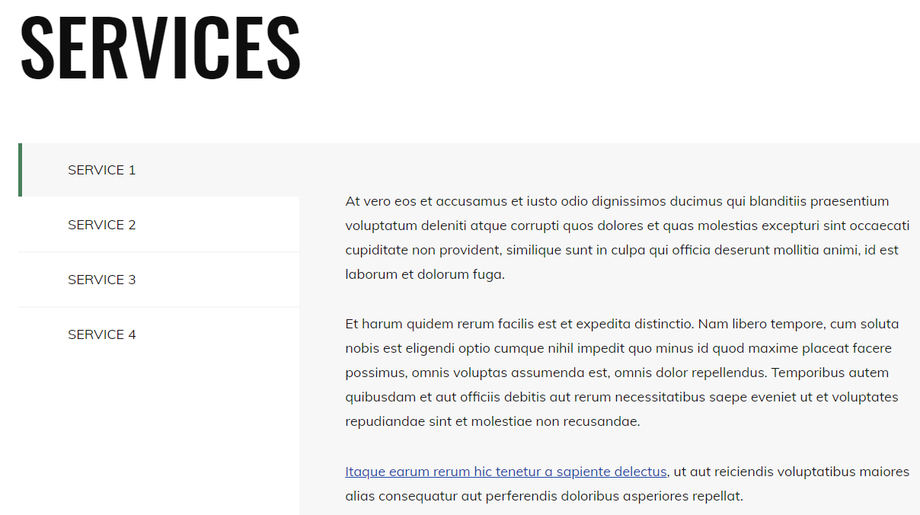
How to manage the Services section placed in tabs WordPress plugin?
The services section from this demo site of the Eco Energy WordPress theme is a place for some description of the services. It's the right place to present information about the company's offer and then optionally redirect to the full info.
The Eco Energy demo site brings a Services section divided into four tabs. Each tab displays a specific post's content. For this purpose, we have used PE Panels WordPress widget.
How to configure a tabs widget?
We will show you how to configure and manage this widget to achieve the same effect with the tabs' content.
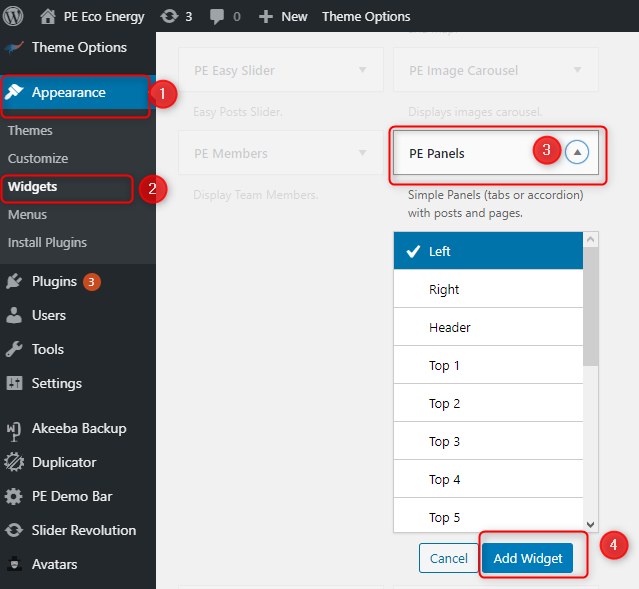
Open your website WordPress dashboard. Navigate to “Appearance” -> “Widgets”. Find PE Panels on the list, open it, set the position you want to place this widget, and then click the "Add widget" button.
TIP: Check here available sidebars in the Eco Energy WordPress theme.
The tabs and the accordion widget can display pages or posts. The main view can be "Tabbed" or "Collapsed (accordion). The essential options configure here, you can see on the image below:

- Set the title
- Set the view as “Tabbed” to get the tabs effect
- Choose and assign “pages” if you want to include them in tabs
- Choose and assign “posts” if you want to include them in tabs
- You can set the order of displayed posts (or pages) by entering their ID’s
There are many more options to choose from, including content limit, read more button, article thumbnail, subtitle, and date. You may control the unlimited number of panels and their ordering.
After the successful configuration of the widget, please use the "Save Widget" button.
How to change testimonials content with a handy WordPress widget?
The testimonials example used on the Eco Energy WordPress theme demo site is the “They say” section.
The section is consistent but in fact, in the backend, it is divided into two widgets.
The left part is using the Testimonial Carousel widget. And this widget displays the content of the testimonial. Let’s see where to find and manage this content.
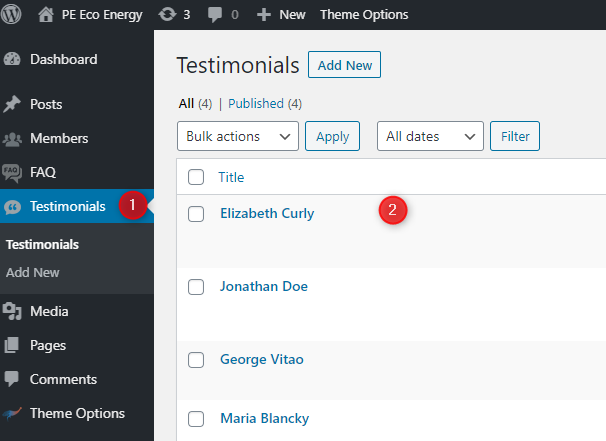
How to manage testimonials?
Open your WordPress dashboard. Navigate to “Testimonials” in the left panel and click it. You will open the list of existing testimonials. There is also an “Add new” option available ( you can create a new testimonial here.)
Choose the first item from the list and click it to open.
Single testimonial content settings

You can edit the title (1), permalink (2), and the main content (3) using the editor.
Under this area, you will see additional two boxes:
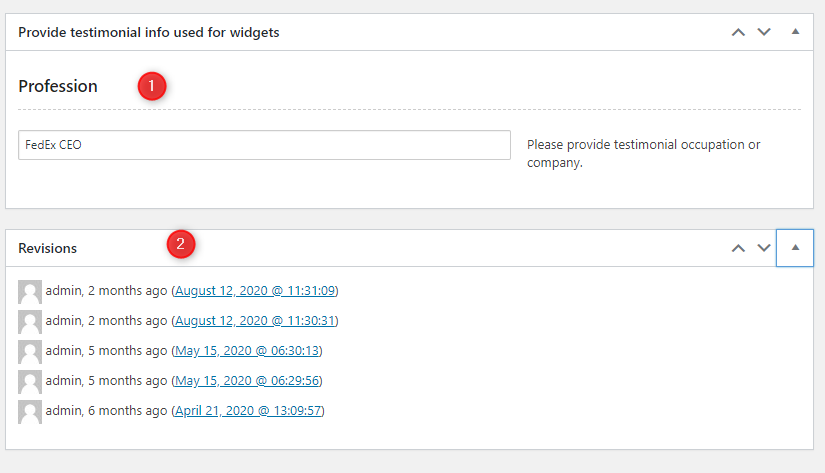
In the first one, you can provide a testimonial occupation or company.
The second box displayed the list of revisions.
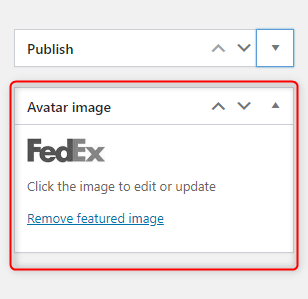
On the right, under the “Publish” box, you will see the “Avatar image” box. It can be used to upload the featured image for this single testimonial.
Single testimonial item view in the widget
Let’s see this single testimonial on the front page displayed with the Testimonial Carousel widget.

It contains all defined elements including:
- The title ( Elizabeth Curly)
- Profession
- The content
- The avatar image
How to modify social icons links in the Eco Energy WordPress theme?
The Eco Energy WordPress theme’s demo example displays Twitter and Facebook social icons in the “Follow us” section placed in the footer.
![]()
For this purpose, we’ve used the Social Icons widget. Icons links can be easily modified using this widget.
Add the PE Social Icons widget
To find and add the widget to your site, open your WordPress panel, and navigate to “Appearance” and to “Widgets”. Find PE Social on the list and click it. Now you can choose the position, where you want to place it. At the end click the “Add widget” button.
![]()
Let’s see the widget main settings:
Edit or add social icon item
The social icon link can be modified in the item edition field. I will show it on the Facebook icon example:
![]()
You can “Add new item” or edit the existing one. As you see, I’ve used the “Edit” button for Facebook item.
After clicking the edit field, the box with “name, icon, and URL” appeared. These settings allow you to add any social media link of your choice. That is very easy to configure. After filling the options click “Save item” button and click "Save" - the widget button.
How to replace images in the carousel widget in the Eco Energy WordPress theme?
The images displayed in the carousel are displayed on the Eco Energy demo site in the “Resources carousel” section.
The section itself contains the content in a simple and transparent appearance. The PE Image Carousel widget is an addition here, attractively displaying the images.

Add the Carousel widget
Open your WordPress control panel. Navigate to “Appearance” -> “Widgets”. Find the “Image Carousel” on the list and click it. Now you can choose the position and add the widget there.

Add images to the Carousel widget
This widget has few useful configuration options, including the possibility to show/hide indicators, show/hide prev/next buttons, use the loop carousel, use the scroll wheel, and choose three different styles.
For us, the issue of adding images is the most important here. The widget has a “Add new item” button under the title. It is purposed for adding images.
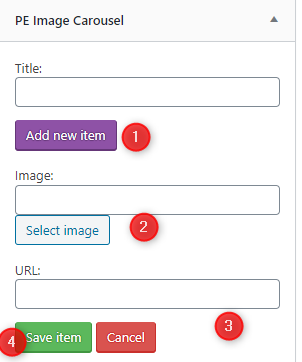
Click the Add new item button (1). Now you can configure a few options.
Use the “Select image” button (2) to upload the image. You can upload files or add the image from the media library.

Type the image’s URL (3) if you want to link it. Save the item or use “Cancel” (4).
After adding the image, it’s visible on the list.
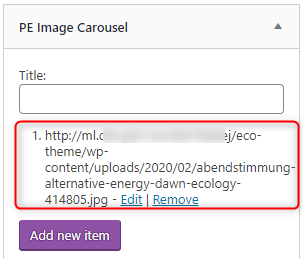
You can edit the item or remove it.
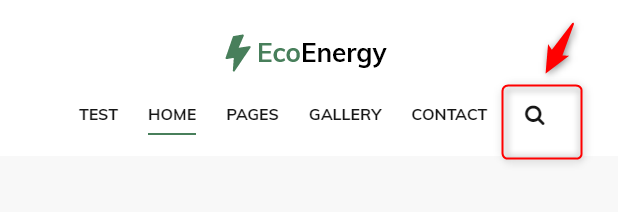
Are there other views for search input in the Eco Energy WordPress theme?
The search input is placed in the top bar on the right side of the top menu.
How to change the search input view?
Open your WordPress admin panel. Navigate to “Theme Options” and then to “Basic Settings.”
Scroll down to “Search form in topbar” options.

You can enable/disable the search form or choose between two views: Standard and Modal Window.
Standard view: the search input appears after clicking on the search icon.
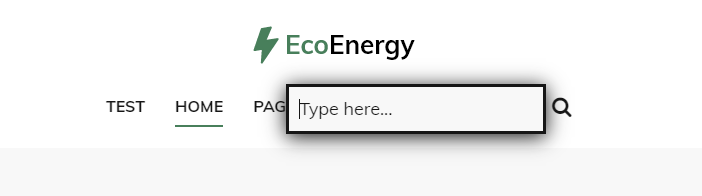
Modal window view: after clicking on the search icon the modal window appears with the search input inside.

How to change copyrights text in the footer area in the Eco Energy WordPress theme?
The Eco Energy WordPress theme demo example has a copyrights text at the bottom of the website.

It’s very easy to change the text there. We will show you how.
Open the WordPress backend. Navigate to the “Theme Options” and then to “Footer”.

You can configure a few options.
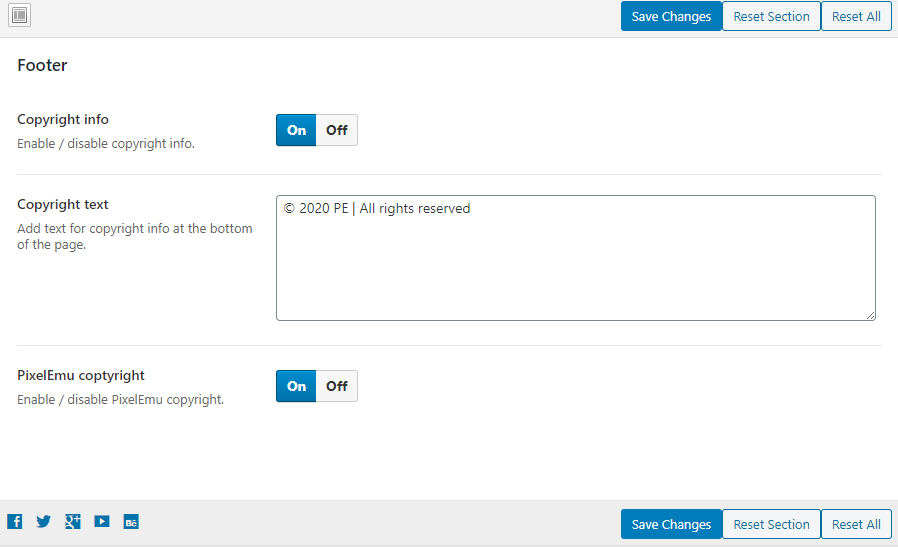
- Copyright Info - Enable / disable copyright info.
- Copyright text - Add text for copyright info at the bottom of the page (the “Copyright Info” button must be set as “On”.)
- PixelEmu copyright - Enable / disable PixelEmu copyright.
After modifying settings click the "Save changes" button.
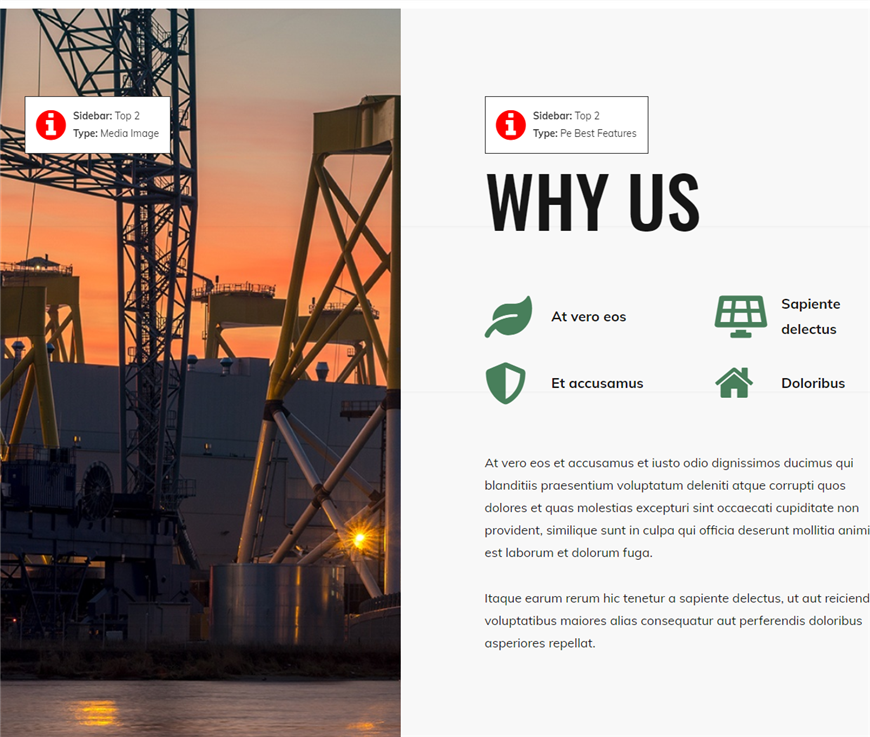
How to manage the "Why Us" section in the Eco Energy WordPress theme?
The "Why us" section is displayed using the Image and PE Best Features widget. We’ve added the big image on the left, focused on the WordPress theme's subject.
Best Features widget is used on the right side. It’s a simple widget that gives the possibility to display icons with their names and descriptions.
Choose between various styles and layouts. Our example shows off icons and a text description below them.
The left side displays a normal media image. We used this to show the whole why us section in an attractive way.
How to configure the Best Features widget?
Navigate to “Appearance” -> “Widgets”. The Best Features widget you can find on the list there.
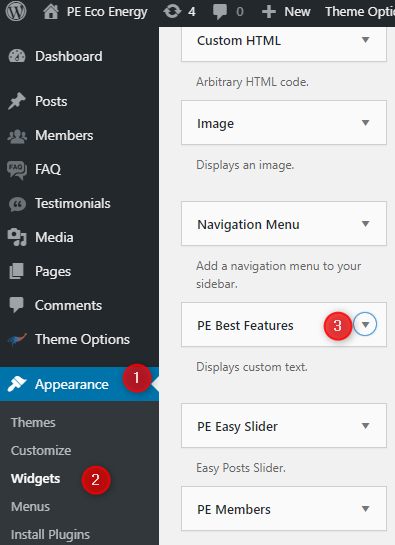
The next step required to add the widget to a chosen sidebar.

Let’s see the widget box most important options (configured for our demo example):
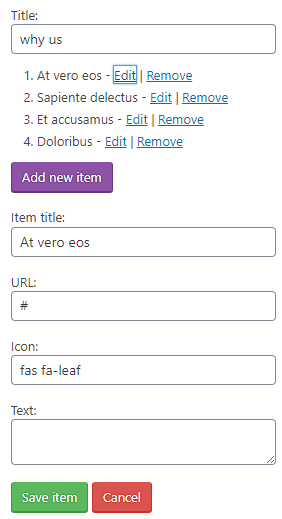
The first thing is the main widget title. Under the title, you can find all the icons previously created on our example (items). Each item can have a title, url link, icon class (font awesome class), and additional text if needed.
Here is the second part of the options:
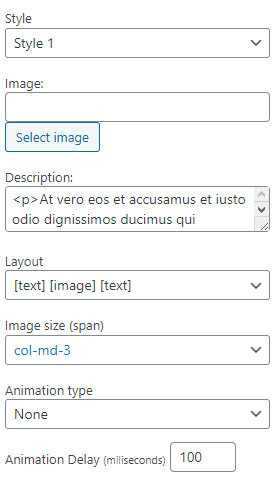
You can choose a style (two styles are available), upload the image (we didn’t use this option on the demo site), write the description that appears below icons. If you uploaded the Image then choose the layout (five variants are available), the image size, and the type of animation from the list (along with its delay).
How to change menu links in the footer section in the Eco Energy WordPress theme?
The footer section of your website can contain links to the website pages of your choice. Guest users browsing the website will see the footer if they scroll to the bottom of your page.
You should consider setting certain pages to be only accessible from the footer. Pages with legal information like Terms & Conditions are often linked only from the footer.
Footer links should be easy for the user to scan and allow him to locate what he is looking for.
It is also recommended to group the footer links into sections that are clearly separated visually, semantically divided.
As you can see in our Eco Energy demo example, in the footer section, there is a set of links (including Rules, Blog, How to use, Privacy policy ) directing to various places on the website.
There are different types of links that can be used in the footer. The chosen type most often depends on the purpose of the link.
Some examples:
- The link directing to the blog, you can connect with the posts page.
- The link to the rules can be a custom link.
- You can also link the menu item with a category, single page, or even a testimonial.
What’s important, to link an item menu somewhere, the content data must already exist. So we attach the links to the ready content :)
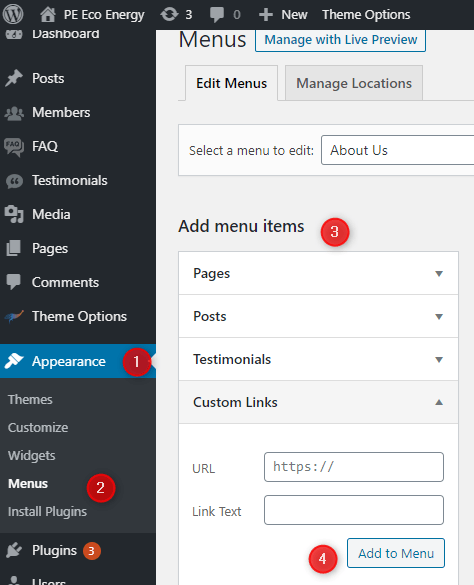
Once you have the content you want to link in the footer, navigate to “Appearance” -> “Menus”. Then, you can choose the type of links from the “Add menu items” section and click the “Add to Menu” button.
As you see in the image below, you can add a menu item using ready pages, posts, and testimonials.
How to manage the contact form in the Eco Energy WordPress theme?
The contact form on the Eco Energy demo site looks like this:
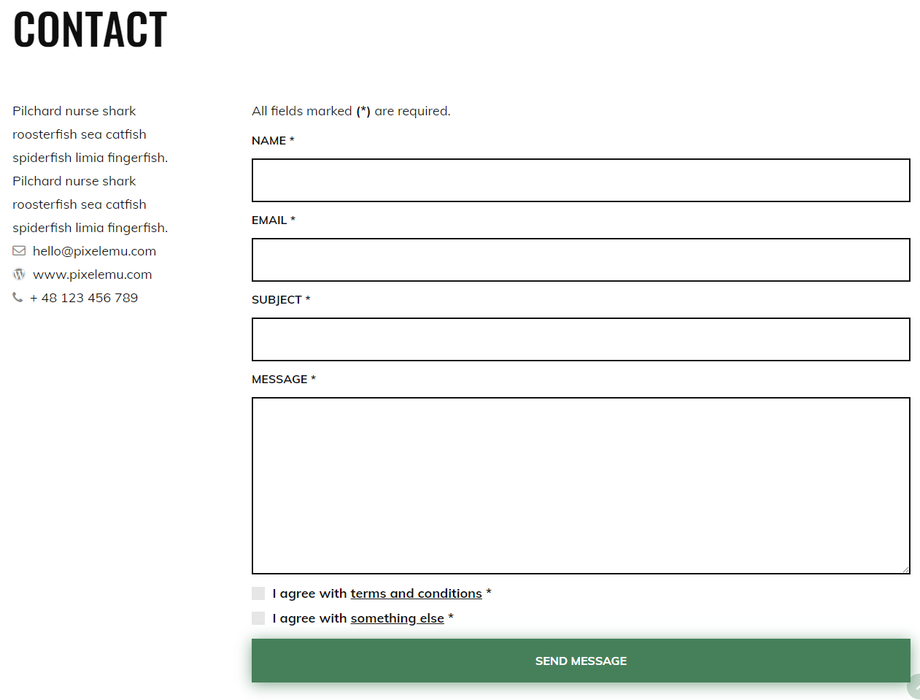
Let’s see how to manage the contact form.
Gathering contact details
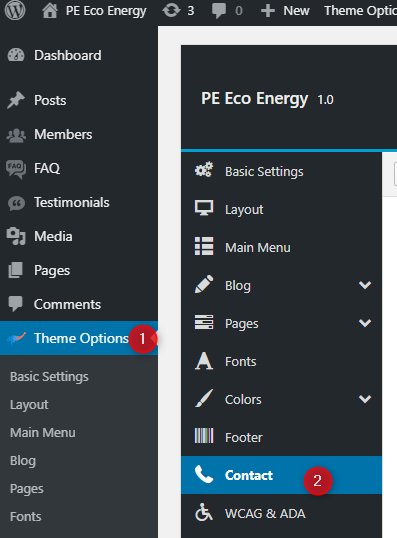
Open your WordPress admin panel and navigate to “Theme Options” -> “Contact.”
There are many options to use - contact details that can be displayed on the Contact Page or with a Contact widget as well.
All options are in one place, while turning on selected sections, options for a given section will appear. For example, if we enable the google map feature, options such as latitude, longitude, and zoom will appear.
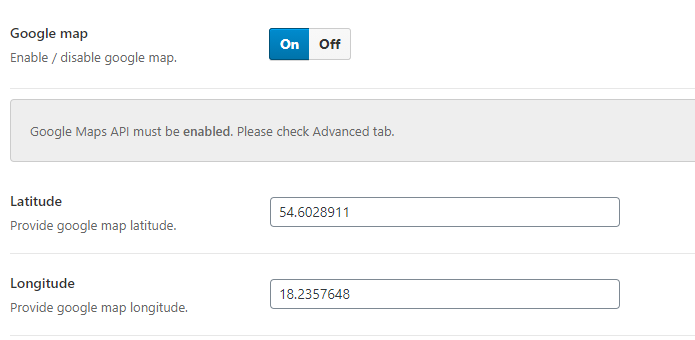
- Google Map - Enable / disable google map (Google Maps API must be enabled. Please check Advanced tab.)
- Latitude - Provide google map latitude.
- Longitude - Provide google map longitude.
- Zoom - Provide google map zoom level.
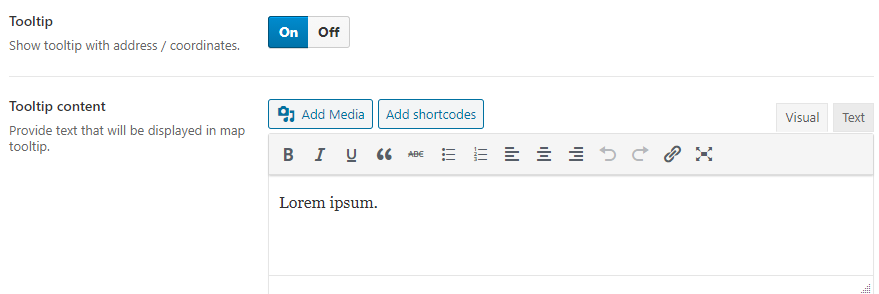
- Tooltip - Show tooltip with address / coordinates.
- Tooltip content - Provide text that will be displayed in the map tooltip.

- Contact form - Enable / disable contact form.
- Email recipients - Provide an email address that will be used to receive messages.

- Consent 1 - Require consent 1 to send the form
- Text for consent 1 label (HTML allowed) - provide the constent content
- Consent 2 - Require consent 2 to send the form
- Text for consent 2 label (HTML allowed) - provide the constent content

- Spam protection - Enable / disable spam protection. ("Google reCaptcha API must be enabled. Please check the Advanced tab.")

- Contact details - Enable / disable contact details.
- Contact address - Here you can provide the address. Shortcodes, links, and media attachments can be used.
How to display the contact form?
As mentioned above, you may create a menu link and assign it to the Contact page or display the context form using the Contact widget.
Displaying the contact form with the Contact widget.
First, let’s find the contact form widget. Navigate to Appearance -> Widgets and find the PE Contact widget on the list. Add it to the widget position you want to place it in.
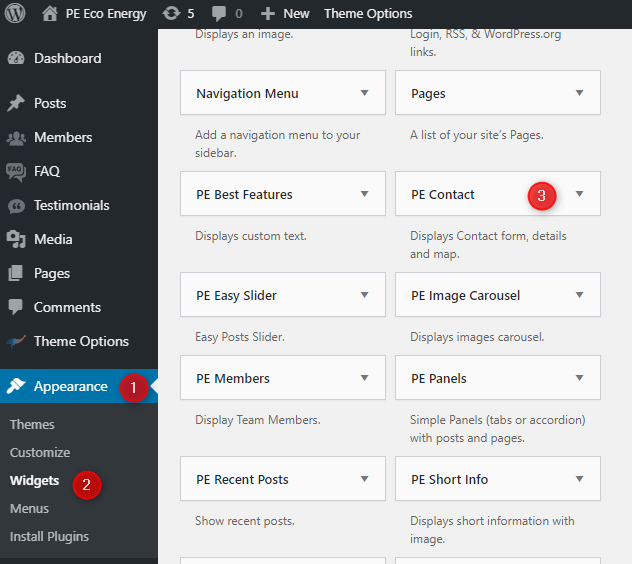
The widget brings a few options. You can directly decide on the Appearance of the contact form, choosing which elements will be visible. Apart from the standard widget settings, which are the same as for other widgets (widget size, show widget for, custom widget classes), it has the options necessary for the contact form display:
Under the “title box,” you see the list of elements ( the ones from Gathering contact details section) that can be displayed or not (Show/hide):
- Contact details
- Form
- Consent 1
- Consent 2
- Captcha
- Google map
- Tooltip on map
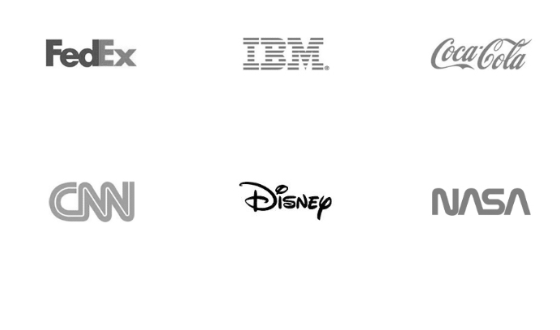
How to change companies' logos in the Eco Energy WordPress theme?
Next to the testimonials section, you will find examples of companies' logos. We've used the PE Easy Slider widget for this purpose. Check the view from the front-page. We've used a static view of six logos. But there are many possibilities for a configuration.
Let's see the options of this widget, necessary for the appearance of the slider.

- Title - you can set the title (our example does not contain any)
- Source - Choose between a "Posts" and a "Folder as a source." We set a folder source to display images only. You need to remember to enter here the correct folder name with images to display. We suggest to make the same height for images to make them look good in a row.
- Image Folder - it works for the "Folder" choice. You can decide for yourself in which folder the images will be placed.
- A number of items in a row - our example has three items in each row.
- A number of rows - we've set two rows for our example.
- Navigation - Bullets/Arrows/None
- Interval in ms - ( 0 - autoplay is disabled )
- Pause on hover - yes/no
- Image height in px - ( 0 - disabled )
- Grid Spacing (px) - this is the space between items.