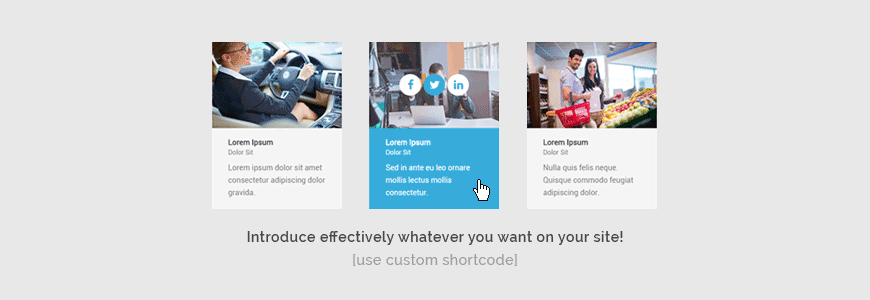
Introduce effectively whatever you want on your site! Use the custom ready made shortcode.
Follow this step by step tutorial to learn how to create a custom shortcode and use the ready made wordpress gallery shortcode of eye catching presentation way that we call "introduction boxes grid".


Some info for beginners. Skip this info if you are advanced coder.
What is a shortcode? Shortcode is a simple code which you can put with square brackets in post content. For what purpose? someone may ask. The fact is that every WordPress-specific short code can be replaced by lots of complicated and ugly looking PHP lines of code that the site administrator could hardly remember. In other words, the shortcode is a macro-instruction that can replace one code by another. For example we can replace one line with hundreds other lines.
WordPress shortcode API is quite simple, we need to create callback function and simple custom shortcode looks like this:[member]or may include attributes:
[member name="Kate Martin"]going one step further, we may handle content in shortcode:
[member name="Kate Martin"]lorem ipsum[/member]
Let's do a simple shortcode
In first example we want to display some text when somebody type [member] in the editor.
First step is to create PHP function. We can do it in functions.php file that should be located in your theme root directory.
function team_member() {
 return 'Lorem ipsum dolor.';
}
add_shortcode('member', 'team_member');
Now we have callback function which returns text. Next we need to assign this function to the shortcode.
add_shortcode is a WordPress function with two arguments.
The first one is the name of shortcode and the second one is a function name which will be related with shortcode.
That's all, our simple shortcode is ready.
At this moment when somebody type [member] in the editor, WordPress will call function team_member and display 'Lorem ipsum dolor.' text.
Enter the custom code to the post:
The above shortcode displays the text
Adding parameters
Once we have simple text already done, now we may add some parameters responsible for displaying image, name and subtitle.
This is how the more advanced function will look like:
function team_member($atts, $content = null) {
 extract(shortcode_atts(array(
 'avatar' => '',
 'name' => '',
 'subtitle' => '',
 'description' => ''
 ), $atts));

 $output = 'Avatar: ' . $avatar . ' Name: ' . $name . ' Subtitle: ' . $subtitle . ' Description: ' . $description;

 return $output;
}
add_shortcode('member', 'team_member');
Function will be able to obtain parametters from $atts variable.
In order to give attributes we need to use WordPress function shortcode_atts which combines user shortcode attributes with known attributes and PHP function extract to import variables from an array.
We can also set different default values for attributes. Example: 'name' => 'Your name'
Next we need to create variable $output with simple text and parameters and return this variable in shortcode function.
At this moment we may enter the shortcode in the editor:
[member avatar='IMG source' name='Kate Martin' subtitle='Make-up artist' description='Lorem ipsum dolor.']

As a result we get:
Opps. Looks not good enough?
Of course, we need to add also additional html code and some css styles :)
Preparing nice looking output
Much longer code with several parametters, we used PHP empty function in order to check if parameter exists.
function team_member($atts, $content = null) {
 extract(shortcode_atts(array(
 'link' => '',
 'avatar' => '',
 'name' => '',
 'subtitle' => '',
 'description' => '',
 'facebook' => '',
 'twitter' => '',
 'linkedin' => ''
 ), $atts));

 //div wrapper
 $output = '<div class="pe-member">';

 //avatar
 if(!empty($avatar)) {
 $alt = (!empty($name)) ? $name : '';
 $output .= '<div class="pe-avatar">';
 $output .= '<img src="' . $avatar . '" alt="' . $alt . '" />';
 //socials
 if(!empty($facebook) || !empty($twitter) || !empty($linkedin)) {
 $output .= '<div class="pe-social">';
 }
 if(!empty($facebook)) {
 $output .= '<a class="pe-facebook" href="' . $facebook . '"><span class="fa fa-facebook"></span></a>';
 }
 if(!empty($twitter)) {
 $output .= '<a class="pe-twitter" href="' . $twitter . '"><span class="fa fa-twitter"></span></a>';
 }
 if(!empty($linkedin)) {
 $output .= '<a class="pe-linkedin" href="' . $linkedin . '"><span class="fa fa-linkedin"></span></a>';
 }
 //end social
 if(!empty($facebook) || !empty($twitter) || !empty($linkedin)) {
 $output .= '</div>';
 }
 //end avatar
 $output .= '</div>';
 }
 //name, subtitle or description
 if(!empty($name) || !empty($subtitle) || !empty($description)) {

 //description link or div
 if(!empty($link)) {
 $output .= '<a class="pe-text" href="' . $link . '">';
 } else {
 $output .= '<div class="pe-text">';
 }
 if(!empty($name)) {
 $output .= '<span class="pe-name">' . $name . '</span>';
 }
 if(!empty($subtitle)) {
 $output .= '<span class="pe-subtitle">' . $subtitle . '</span>';
 }
 if(!empty($description)) {
 $output .= '<span class="pe-description">' . $description . '</span>';
 }

 //end description
 if(!empty($link)) {
 $output .= '</a>';
 } else {
 $output .= '</div>';
 }

 }

 //end div wrapper
 $output .= '</div>';

 return $output;
}
add_shortcode('member', 'team_member');
The example of the above custom shortcode should be fully working at this moment, but we need also add some CSS styles for nice looking. We can add these styles in any existing css files in template (or in Dynamic CSS section in Pixelemu themes)
.pe-member {
 background: #fff;
 margin: 15px 0;
}

.pe-member .pe-avatar {
 position: relative;
 text-align: center;
 min-height: 50px;
}

.pe-member .pe-avatar img {
 max-width: 100%;
 height: auto;
 border: none;
}

.pe-member .pe-avatar .pe-social {
 position: absolute;
 top: 50%;
 -webkit-transform: translateY(-50%);
 transform: translateY(-50%);
 left: 0;
 right: 0;
 opacity: 0;
 pointer-events: none;
}

.pe-member:hover .pe-avatar .pe-social {
 opacity: 1;
 pointer-events: auto;
}

.pe-member:hover .pe-avatar img {
 opacity: 0.8;
}

.pe-member .pe-avatar .pe-social a {
 display: inline-block;
 vertical-align: top;
 font-size: 20px;
 width: 40px;
 height: 40px;
 line-height: 40px;
 background: #ffffff;
 color: #37abda;
 text-align: center;
 margin: 0 2px;
 border-radius: 50%;
 -webkit-border-radius: 50%;
}

.pe-member .pe-avatar .pe-social a:hover {
 background: #37abda;
 color: #ffffff;
}

.pe-member .pe-text {
 display: block;
 padding: 20px 30px;
 background: #f5f5f5;
 color: #858585;
}

.pe-member:hover .pe-text {
 text-decoration: none;
 background: #37abda;
 color: #ffffff;
}

.pe-member .pe-text .pe-name {
 display: block;
 font-weight: bold;
 line-height: 1.1;
 color: #444444;
}

.pe-member .pe-text .pe-name + * {
 margin: 5px 0 0;
}

.pe-member:hover .pe-text .pe-name {
 color: #ffffff;
}

.pe-member .pe-text .pe-subtitle {
 display: block;
 font-size: 0.85em;
 line-height: 1.1;
}

.pe-member .pe-text .pe-subtitle + * {
 margin: 10px 0 0;
}

.pe-member .pe-text .pe-description {
 display: block;
}
Wordpress shortcodes are really helpfull when formatting blog posts. With only one line of code in the editor:
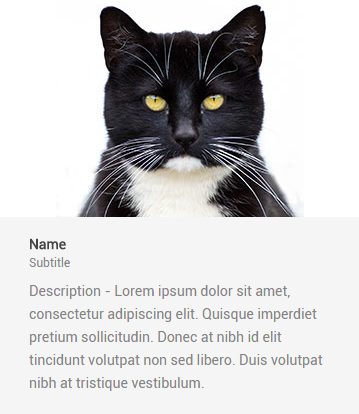
[member avatar='http://tricks.pixelemu.com/images/member-1.jpg' name='Make-up artist' subtitle='Make-up artist' description='Lorem ipsum dolor consectetur.' facebook='http://facebook.com' twitter='http://twitter.com' linkedin='http://linkedin.com']
We may display nice box with member avatar:
In this example I'm using Font Awesome icons for socials. Remember you should load Font Awesome in your theme if you want use icons (by default loaded in PixelEmu themes).
Multiple shortcodes
Of course we can have multiple shortcodes. We can even make shortcodes in shortcodes. This is really nice idea if we like to have groups of items.
In our example I will show how to prepare grid with team members in order to display many boxes in one row.
Let's do the second shortcode that allows to display many items in one row.
function team_group($atts, $content = null) {

 $output = '<div class="pe-team-group">';
 $output .= '<div class="row">';
 $output .= do_shortcode($content);
 $output .= '</div>';
 $output .= '</div>';

 return $output;
}
add_shortcode('team', 'team_group');
In this case we have one additional parameter $content, and WordPress function do_shortcode which search the content for shortcodes and filter shortcodes through their hooks.
At this moment we can have additional div around previous shortcodes:
[team][member avatar='http://tricks.pixelemu.com/images/member-1.jpg' name='Kate Martin' subtitle='Make-up artist' description='Lorem ipsum dolor consectetur.' facebook='http://facebook.com' twitter='http://twitter.com' linkedin='http://linkedin.com'][member avatar='http://tricks.pixelemu.com/images/member-2.jpg' name='Jane Johnson' subtitle='Stylist' description='Lorem ipsum dolor consectetur.' facebook='http://facebook.com' twitter='http://twitter.com' linkedin='http://linkedin.com'][member avatar='http://tricks.pixelemu.com/images/member-3.jpg' name='Andrea Rossi' subtitle='Trainer' description='Lorem ipsum dolor consectetur.' facebook='http://facebook.com' twitter='http://twitter.com' linkedin='http://linkedin.com'][/team]
But, that is not the end.
We need also set size for each boxes. In this case we can use just one additional attribute in team_member function:
function team_member($atts) {
 extract(shortcode_atts(array(
 'size' => 12,
 'link' => '',
 'avatar' => '',
 'name' => '',
 'subtitle' => '',
 'description' => '',
 'facebook' => '',
 'twitter' => '',
 'linkedin' => ''
 ), $atts));

 //div wrapper
 $output = '<div class="col-md-' . $size . '">';
 $output .= '<div class="pe-member">';

 //avatar
 if(!empty($avatar)) {
 $alt = (!empty($name)) ? $name : '';
 $output .= '<div class="pe-avatar">';
 $output .= '<img src="' . $avatar . '" alt="' . $alt . '" />';
 //socials
 if(!empty($facebook) || !empty($twitter) || !empty($linkedin)) {
 $output .= '<div class="pe-social">';
 }
 if(!empty($facebook)) {
 $output .= '<a class="pe-facebook" href="' . $facebook . '"><span class="fa fa-facebook"></span></a>';
 }
 if(!empty($twitter)) {
 $output .= '<a class="pe-twitter" href="' . $twitter . '"><span class="fa fa-twitter"></span></a>';
 }
 if(!empty($linkedin)) {
 $output .= '<a class="pe-linkedin" href="' . $linkedin . '"><span class="fa fa-linkedin"></span></a>';
 }
 //end social
 if(!empty($facebook) || !empty($twitter) || !empty($linkedin)) {
 $output .= '</div>';
 }
 //end avatar
 $output .= '</div>';
 }
 //name, subtitle or description
 if(!empty($name) || !empty($subtitle) || !empty($description)) {

 //description link or div
 if(!empty($link)) {
 $output .= '<a class="pe-text" href="' . $link . '">';
 } else {
 $output .= '<div class="pe-text">';
 }
 if(!empty($name)) {
 $output .= '<span class="pe-name">' . $name . '</span>';
 }
 if(!empty($subtitle)) {
 $output .= '<span class="pe-subtitle">' . $subtitle . '</span>';
 }
 if(!empty($description)) {
 $output .= '<span class="pe-description">' . $description . '</span>';
 }

 //end description
 if(!empty($link)) {
 $output .= '</a>';
 } else {
 $output .= '</div>';
 }

 }

 //end div wrapper
 $output .= '</div>';
 $output .= '</div>';

 return $output;
}
add_shortcode('member', 'team_member');
Attribute size has a default value 12 because we like to have col-md-12 class by default if not given size attribute in shortcode.
Now we can finally use our new shortcodes, two at the same time:
[team][member link='https://pixelemu.com' avatar='http://tricks.pixelemu.com/images/member-1.jpg' size='3' name='Kate Martin' subtitle='Make-up artist' description='Lorem ipsum dolor consectetur.' facebook='http://facebook.com' twitter='http://twitter.com' linkedin='http://linkedin.com'][member link='https://pixelemu.com' avatar='http://tricks.pixelemu.com/images/member-2.jpg' size='3' name='Jane Johnson' subtitle='Stylist' description='Lorem ipsum dolor consectetur.' facebook='http://facebook.com' twitter='http://twitter.com' linkedin='http://linkedin.com'][member link='https://pixelemu.com' avatar='http://tricks.pixelemu.com/images/member-3.jpg' size='3' name='Andrea Rossi' subtitle='Trainer' description='Lorem ipsum dolor consectetur.' facebook='http://facebook.com' twitter='http://twitter.com' linkedin='http://linkedin.com'][member link='https://pixelemu.com' avatar='http://tricks.pixelemu.com/images/member-4.jpg' size='3' name='Victoria Harris' subtitle='Dietician' description='Lorem ipsum dolor consectetur.' facebook='http://facebook.com' twitter='http://twitter.com' linkedin='http://linkedin.com'][/team]
You may use any other shortcodes inside [team].
The final result:
In this example I'm using Bootstrap classes, but feel free to use your own styles or classes.
.row {
 margin: 0 -15px;
}

.col-md-3,
.col-md-4,
.col-md-6,
.col-md-12 {
 float: left;
 padding: 0 15px;
 box-sizing: border-box;
 -webkit-box-sizing: border-box;
}

.col-md-3 {
 width: 25%;
}

.col-md-4 {
 width: 33.33333333333333%;
}

.col-md-6 {
 width: 50%;
}

.col-md-12 {
 width: 100%;
}
Shortcodes in widgets, comments or excerpts
By default, shortcodes are ignored in WordPress sidebar widgets, but we can enable this functionality very easy. Just add single line in functions.php file:
add_filter('widget_text', 'do_shortcode');
Now we can use our shortcodes in widgets :)
or even comments and excerpts:
add_filter( 'comment_text', 'do_shortcode' );
add_filter( 'the_excerpt', 'do_shortcode');
Have you found this tutorial helpful? Please share. Thanks!